Ensure you have available Pinot Minion instances deployed within the cluster.
Pinot version is 0.11.0 or above
How it works
Parse the query with the table name and directory URI along with a list of options for the ingestion job.
Call controller minion task execution API endpoint to schedule the task on minion
Response has the schema of table name and task job id.
Usage Syntax
INSERT INTO [database.]table FROM FILE dataDirURI OPTION ( k=v ) [, OPTION (k=v)]*
Example
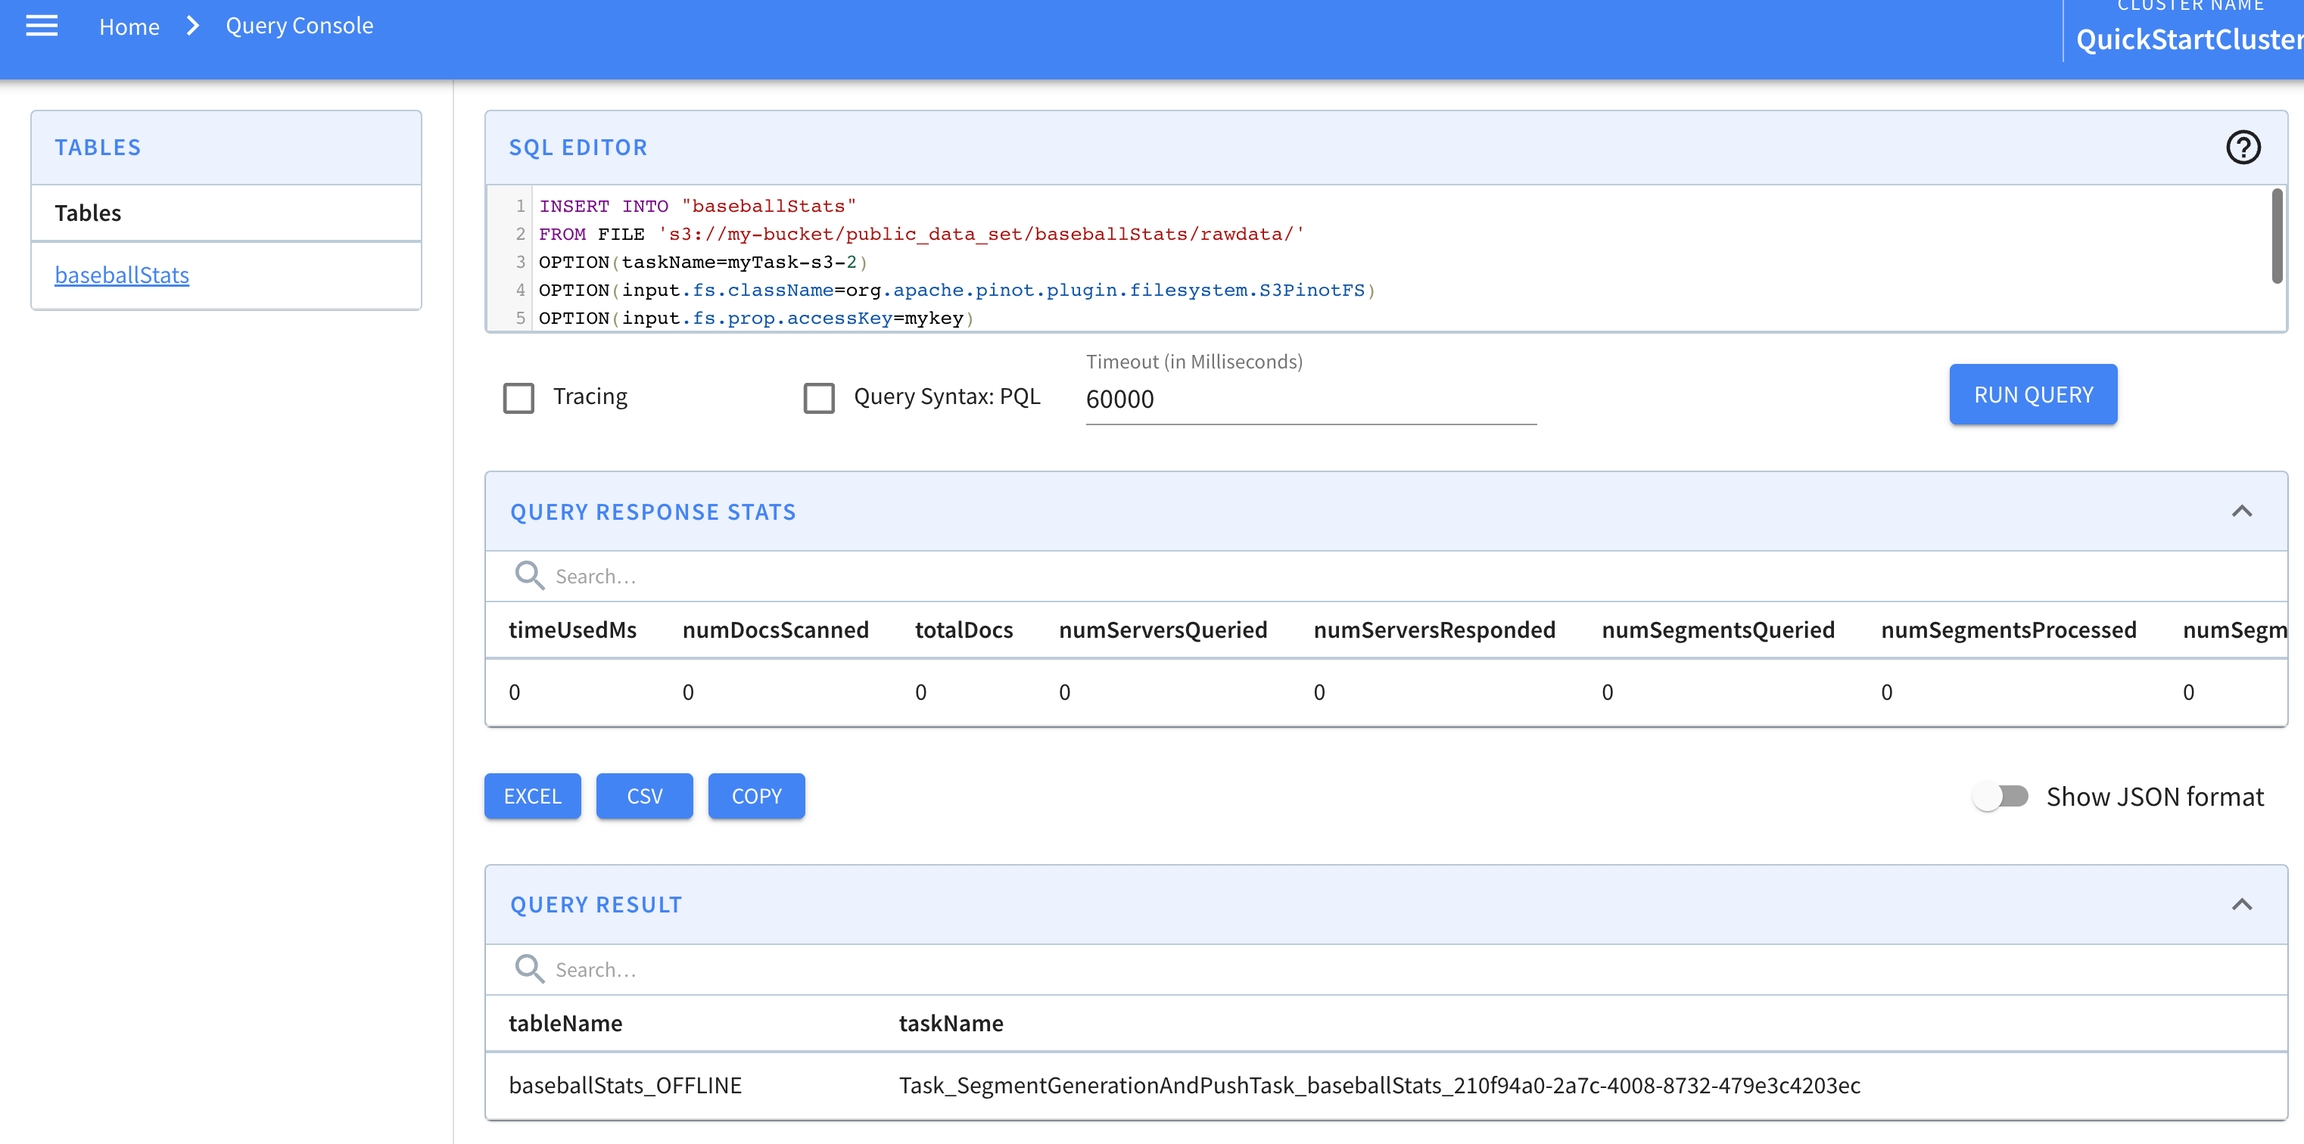
Screenshot
Insert Rows into Pinot
We are actively developing this feature...
The details will be revealed soon.
SET taskName = 'myTask-s3';
SET input.fs.className = 'org.apache.pinot.plugin.filesystem.S3PinotFS';
SET input.fs.prop.accessKey = 'my-key';
SET input.fs.prop.secretKey = 'my-secret';
SET input.fs.prop.region = 'us-west-2';
INSERT INTO "baseballStats"
FROM FILE 's3://my-bucket/public_data_set/baseballStats/rawdata/'
Spark
Batch ingestion of data into Apache Pinot using Apache Spark.
Pinot supports Apache Spark (2.x and 3.x) as a processor to create and push segment files to the database. Pinot distribution is bundled with the Spark code to process your files and convert and upload them to Pinot.
To set up Spark, do one of the following:
Use the Spark-Pinot Connector. For more information, see the ReadMe.
Follow the instructions below.
You can follow the to build Pinot from source. The resulting JAR file can be found in pinot/target/pinot-all-${PINOT_VERSION}-jar-with-dependencies.jar
If you do build Pinot from Source, you should consider opting into using the build-shaded-jar jar profile with -Pbuild-shaded-jar. While Pinot does not bundle spark into its jar, it does bundle certain hadoop libraries.
Next, you need to change the execution config in the to the following:
To run Spark ingestion, you need the following jars in your classpath
pinot-batch-ingestion-spark plugin jar - available in plugins-external directory in the package
pinot-all jar - available in lib directory in the package
These jars can be specified using spark.driver.extraClassPath or any other option.
For loading any other plugins that you want to use, use:
The complete spark-submit command should look like this:
Ensure environment variables PINOT_ROOT_DIR and PINOT_VERSION are set properly.
Note: You should change the master to yarn and deploy-mode to cluster for production environments.
We have stopped including spark-core dependency in our jars post 0.10.0 release. Users can try 0.11.0-SNAPSHOT and later versions of pinot-batch-ingestion-spark in case of any runtime issues. You can either or download latest master build jars.
Running in Cluster Mode on YARN
If you want to run the spark job in cluster mode on YARN/EMR cluster, the following needs to be done -
Build Pinot from source with option -DuseProvidedHadoop
Copy Pinot binaries to S3, HDFS or any other distributed storage that is accessible from all nodes.
Copy Ingestion spec YAML file to S3, HDFS or any other distributed storage. Mention this path as part of --files
Example
For Spark 3.x, replace pinot-batch-ingestion-spark-2.4 with pinot-batch-ingestion-spark-3.2 in all places in the commands.
Also, ensure the classpath in ingestion spec is changed from org.apache.pinot.plugin.ingestion.batch.spark.
to
org.apache.pinot.plugin.ingestion.batch.spark3.
FAQ
Q - I am getting the following exception - Class has been compiled by a more recent version of the Java Runtime (class file version 55.0), this version of the Java Runtime only recognizes class file versions up to 52.0
Since 0.8.0 release, Pinot binaries are compiled with JDK 11. If you are using Spark along with Hadoop 2.7+, you need to use the Java8 version of Pinot. Currently, you need to .
Q - I am not able to find pinot-batch-ingestion-spark jar.
For Pinot version prior to 0.10.0, the spark plugin is located in plugin dir of binary distribution. For 0.10.0 and later, it is located in pinot-external dir.
Q - Spark is not able to find the jarsleading tojava.nio.file.NoSuchFileException
This means the classpath for spark job has not been configured properly. If you are running spark in a distributed environment such as Yarn or k8s, make sure both spark.driver.classpath and spark.executor.classpath are set. Also, the jars in driver.classpath should be added to --jars argument in spark-submit so that spark can distribute those jars to all the nodes in your cluster. You also need to take provide appropriate scheme with the file path when running the jar. In this doc, we have used local:\\ but it can be different depending on your cluster setup.
Q - Spark job failing while pushing the segments.
It can be because of misconfigured controllerURI in job spec yaml file. If the controllerURI is correct, make sure it is accessible from all the nodes of your YARN or k8s cluster.
Q - My data gets overwritten during ingestion.
Set to APPEND in the tableConfig.
If already set to APPEND, this is likely due to a missing timeColumnName in your table config. If you can't provide a time column, use our in ingestion spec. Generally using inputFile segment name generator should fix your issue.
Q - I am getting java.lang.RuntimeException: java.io.IOException: Failed to create directory: pinot-plugins-dir-0/plugins/*
Removing -Dplugins.dir=${PINOT_DISTRIBUTION_DIR}/plugins from spark.driver.extraJavaOptions should fix this. As long as plugins are mentioned in classpath and jars argument it should not be an issue.
Q - Getting Class not found: exception
Check if extraClassPath arguments contain all the plugin jars for both driver and executors. Also, all the plugin jars are mentioned in the --jars argument. If both of these are correct, check if the extraClassPath contains local filesystem classpaths and not s3 or hdfs or any other distributed file system classpaths.
argument in the command
Add --jars options that contain the s3/hdfs paths to all the required plugin and pinot-all jar
Point classPath to spark working directory. Generally, just specifying the jar names without any paths works. Same should be done for main jar as well as the spec YAML file
# executionFrameworkSpec: Defines ingestion jobs to be running.
executionFrameworkSpec:

  # name: execution framework name
  name: 'spark'

  # segmentGenerationJobRunnerClassName: class name implements org.apache.pinot.spi.ingestion.batch.runner.IngestionJobRunner interface.
  segmentGenerationJobRunnerClassName: 'org.apache.pinot.plugin.ingestion.batch.spark.SparkSegmentGenerationJobRunner'

  # segmentTarPushJobRunnerClassName: class name implements org.apache.pinot.spi.ingestion.batch.runner.IngestionJobRunner interface.
  segmentTarPushJobRunnerClassName: 'org.apache.pinot.plugin.ingestion.batch.spark.SparkSegmentTarPushJobRunner'

  # segmentUriPushJobRunnerClassName: class name implements org.apache.pinot.spi.ingestion.batch.runner.IngestionJobRunner interface.
  segmentUriPushJobRunnerClassName: 'org.apache.pinot.plugin.ingestion.batch.spark.SparkSegmentUriPushJobRunner'

  #segmentMetadataPushJobRunnerClassName: class name implements org.apache.pinot.spi.ingestion.batch.runner.IngestionJobRunner interface
  segmentMetadataPushJobRunnerClassName: 'org.apache.pinot.plugin.ingestion.batch.spark.SparkSegmentMetadataPushJobRunner'

  # extraConfigs: extra configs for execution framework.
  extraConfigs:

    # stagingDir is used in distributed filesystem to host all the segments then move this directory entirely to output directory.
    stagingDir: your/local/dir/staging
Support for encoding fields with CLP during ingestion.
This is an experimental feature. Configuration options and usage may change frequently until it is stabilized.
When performing stream ingestion of JSON records using Kafka, users can encode specific fields with CLP by using a CLP-specific StreamMessageDecoder.
CLP is a compressor designed to encode unstructured log messages in a way that makes them more compressible while retaining the ability to search them. It does this by decomposing the message into three fields:
the message's static text, called a log type;
repetitive variable values, called dictionary variables; and
non-repetitive variable values (called encoded variables since we encode them specially if possible).
Searches are similarly decomposed into queries on the individual fields.
Although CLP is designed for log messages, other unstructured text like file paths may also benefit from its encoding.
For example, consider this JSON record:
If the user specifies the fields message and logPath should be encoded with CLP, then the StreamMessageDecoder will output:
In the fields with the _logtype suffix, \x11 is a placeholder for an integer variable, \x12 is a placeholder for a dictionary variable, and \x13 is a placeholder for a float variable. In message_encoedVars, the float variable 0.335 is encoded as an integer using CLP's custom encoding.
All remaining fields are processed in the same way as they are in org.apache.pinot.plugin.inputformat.json.JSONRecordExtractor. Specifically, fields in the table's schema are extracted from each record and any remaining fields are dropped.
Configuration
Table Index
Assuming the user wants to encode message and logPath as in the example, they should change/add the following settings to their tableIndexConfig (we omit irrelevant settings for brevity):
stream.kafka.decoder.prop.fieldsForClpEncoding is a comma-separated list of names for fields that should be encoded with CLP.
We use for the logtype and dictionary variables since their length can vary significantly.
Ideally, we would disable the dictionaries for the encoded variable columns (since they are likely to be random), but currently, a bug prevents us from doing that for multi-valued number-type columns.
Schema
For the table's schema, users should configure the CLP-encoded fields as follows (we omit irrelevant settings for brevity):
We use the maximum possible length for the logtype and dictionary variable columns.
The dictionary and encoded variable columns are multi-valued columns.
Searching and decoding CLP-encoded fields
There is currently no built-in support within Pinot for searching and decoding CLP-encoded fields. This will be added in future commits, potentially as a set of UDFs. The development of these features is being tracked in this .
Batch ingestion of data into Apache Pinot using Apache Flink.
Pinot supports Apache Flink as a processing framework to push segment files to the database.
Pinot distribution contains an Apache Flink SinkFunction that can be used as part of the Apache Flink application (Streaming or Batch) to directly write into a designated Pinot database.
Example
Flink application
Here is an example code snippet to show how to utilize the in a Flink streaming application:
As in the example shown above, the only required information from the Pinot side is the table and the table .
For a more detailed executable, refer to the .
Table Config
PinotSinkFunction uses mostly the TableConfig object to infer the batch ingestion configuration to start a SegmentWriter and SegmentUploader to communicate with the Pinot cluster.
Note that even though in the above example Flink application is running in streaming mode, the data is still batch together and flush/upload to Pinot once the flush threshold is reached. It is not a direct streaming write into Pinot.
Here is an example table config
the only required configurations are:
"outputDirURI": where PinotSinkFunction should write the constructed segment file to
"push.controllerUri": which Pinot cluster (controller) URL PinotSinkFunction should communicate with.
The rest of the configurations are standard for any Pinot table.
Dimension table
Batch ingestion of data into Apache Pinot using dimension tables.
Dimension tables are a special kind of offline tables from which data can be looked up via the lookup UDF, providing join-like functionality.
Dimension tables are replicated on all the hosts for a given tenant to allow faster lookups.
To mark an offline table as a dimension table, isDimTable should be set to true and segmentsConfig.segementPushType should be set to REFRESH in the table config, like this:
When a table is marked as a dimension table, it will be replicated on all the hosts, which means that these tables must be small in size.
The maximum size quota for a dimension table in a cluster is controlled by the controller.dimTable.maxSize controller property. Table creation will fail if the storage quota exceeds this maximum size.
A dimension table cannot be part of a .
File Systems
This section contains a collection of short guides to show you how to import data from a Pinot-supported file system.
FileSystem is an abstraction provided by Pinot to access data stored in distributed file systems (DFS).
Pinot uses distributed file systems for the following purposes:
Batch ingestion job: To read the input data (CSV, Avro, Thrift, etc.) and to write generated segments to DFS.
Controller: When a segment is uploaded to the controller, the controller saves it in the configured DFS.
Server:- When a server(s) is notified of a new segment, the server copies the segment from remote DFS to their local node using the DFS abstraction.
Supported file systems
Pinot lets you choose a distributed file system provider. The following file systems are supported by Pinot:
Enabling a file system
To use a distributed file system, you need to enable plugins. To do that, specify the plugin directory and include the required plugins:
You can change the file system in the controller and server configuration. In the following configuration example, the URI is s3://bucket/path/to/file and scheme refers to the file system URI prefix s3.
You can also change the file system during ingestion. In the ingestion job spec, specify the file system with the following configuration:
HDFS
This guide shows you how to import data from HDFS.
Enable the using the pinot-hdfs plugin. In the controller or server, add the config:
By default Pinot loads all the plugins, so you can just drop this plugin there. Also, if you specify -Dplugins.include, you need to put all the plugins you want to use, e.g. pinot-json, pinot-avro , pinot-kafka-2.0...
Azure Data Lake Storage
This guide shows you how to import data from files stored in Azure Data Lake Storage Gen2 (ADLS Gen2)
Enable the Azure Data Lake Storage using the pinot-adls plugin. In the controller or server, add the config:
By default Pinot loads all the plugins, so you can just drop this plugin there. Also, if you specify -Dplugins.include, you need to put all the plugins you want to use, e.g. pinot-json, pinot-avro , pinot-kafka-2.0...
Stream Ingestion with Dedup
Deduplication support in Apache Pinot.
Pinot provides native support for deduplication (dedup) during the real-time ingestion (v0.11.0+).
Prerequisites for enabling dedup
To enable dedup on a Pinot table, make the following table configuration and schema changes:
Reload a table segment
Reload a table segment in Apache Pinot.
When Pinot writes data to segments in a table, it saves those segments to a deep store location specified in your , such as a storage drive or Amazon S3 bucket.
To reload segments from your deep store, use the Pinot Controller API or Pinot Admin Console.
Use the Pinot Controller API to reload segments
To reload all segments from a table, use:
Backfill Data
Batch ingestion of backfill data into Apache Pinot.
Introduction
Pinot batch ingestion involves two parts: routine ingestion job(hourly/daily) and backfill. Here are some examples to show how routine batch ingestion works in Pinot offline table:
Organize raw data into buckets (eg: /var/pinot/airlineStats/rawdata/2014/01/01). Each bucket typically contains several files (eg: /var/pinot/airlineStats/rawdata/2014/01/01/airlineStats_data_2014-01-01_0.avro)
Run a Pinot batch ingestion job, which points to a specific date folder like ‘/var/pinot/airlineStats/rawdata/2014/01/01’. The segment generation job will convert each such avro file into a Pinot segment for that day and give it a unique name.
Run Pinot segment push job to upload those segments with those uniques names via a Controller API
IMPORTANT: The segment name is the unique identifier used to uniquely identify that segment in Pinot. If the controller gets an upload request for a segment with the same name - it will attempt to replace it with the new one.
This newly uploaded data can now be queried in Pinot. However, sometimes users will make changes to the raw data which need to be reflected in Pinot. This process is known as 'Backfill'.
How to backfill data in Pinot
Pinot supports data modification only at the segment level, which means you must update entire segments for doing backfills. The high level idea is to repeat steps 2 (segment generation) and 3 (segment upload) mentioned above:
Backfill jobs must run at the same granularity as the daily job. E.g., if you need to backfill data for 2014/01/01, specify that input folder for your backfill job (e.g.: ‘/var/pinot/airlineStats/rawdata/2014/01/01’)
The backfill job will then generate segments with the same name as the original job (with the new data).
When uploading those segments to Pinot, the controller will replace the old segments with the new ones (segment names act like primary keys within Pinot) one by one.
Edge case example
Backfill jobs expect the same number of (or more) data files on the backfill date. So the segment generation job will create the same number of (or more) segments than the original run.
For example, assuming table airlineStats has 2 segments(airlineStats_2014-01-01_2014-01-01_0, airlineStats_2014-01-01_2014-01-01_1) on date 2014/01/01 and the backfill input directory contains only 1 input file. Then the segment generation job will create just one segment: airlineStats_2014-01-01_2014-01-01_0. After the segment push job, only segment airlineStats_2014-01-01_2014-01-01_0 got replaced and stale data in segment airlineStats_2014-01-01_2014-01-01_1 are still there.
If the raw data is modified in such a way that the original time bucket has fewer input files than the first ingestion run, backfill will fail.
HDFS implementation provides the following options:
hadoop.conf.path: Absolute path of the directory containing Hadoop XML configuration files, such as hdfs-site.xml, core-site.xml .
hadoop.write.checksum: Create checksum while pushing an object. Default is false
hadoop.kerberos.principle
hadoop.kerberos.keytab
Each of these properties should be prefixed by pinot.[node].storage.factory.class.hdfs. where node is either controller or server depending on the config
The kerberos configs should be used only if your Hadoop installation is secured with Kerberos. Refer to the Hadoop in secure mode documentation for information on how to secure Hadoop using Kerberos.
You must provide proper Hadoop dependencies jars from your Hadoop installation to your Pinot startup scripts.
Push HDFS segment to Pinot Controller
To push HDFS segment files to Pinot controller, send the HDFS path of your newly created segment files to the Pinot Controller. The controller will download the files.
This curl example requests tells the controller to download segment files to the proper table:
Azure Blob Storage provides the following options:
accountName: Name of the Azure account under which the storage is created.
accessKey: Access key required for the authentication.
fileSystemName: Name of the file system to use, for example, the container name (similar to the bucket name in S3).
enableChecksum: Enable MD5 checksum for verification. Default is false.
Each of these properties should be prefixed by pinot.[node].storage.factory.class.adl2. where node is either controller or server depending on the config, like this:
Examples
Job spec
Controller config
Server config
Minion config
Define the primary key in the schema
To be able to dedup records, a primary key is needed to uniquely identify a given record. To define a primary key, add the field primaryKeyColumns to the schema definition.
Note this field expects a list of columns, as the primary key can be composite.
While ingesting a record, if its primary key is found to be already present, the record will be dropped.
Partition the input stream by the primary key
An important requirement for the Pinot dedup table is to partition the input stream by the primary key. For Kafka messages, this means the producer shall set the key in the send API. If the original stream is not partitioned, then a streaming processing job (e.g. Flink) is needed to shuffle and repartition the input stream into a partitioned one for Pinot's ingestion.
Use strictReplicaGroup for routing
The dedup Pinot table can use only the low-level consumer for the input streams. As a result, it uses the partitioned replica-group assignment for the segments. Moreover, dedup poses the additional requirement that all segments of the same partition must be served from the same server to ensure the data consistency across the segments. Accordingly, it requires strictReplicaGroup as the routing strategy. To use that, configure instanceSelectorType in Routing as the following:
Other limitations
The high-level consumer is not allowed for the input stream ingestion, which means stream.kafka.consumer.type must be lowLevel.
The incoming stream must be partitioned by the primary key such that, all records with a given primaryKey must be consumed by the same Pinot server instance.
Enable dedup in the table configurations
To enable dedup for a REALTIME table, add the following to the table config.
Supported values for hashFunction are NONE, MD5 and MURMUR3, with the default being NONE.
Best practices
Unlike other real-time tables, Dedup table takes up more memory resources as it needs to bookkeep the primary key and its corresponding segment reference, in memory. As a result, it's important to plan the capacity beforehand, and monitor the resource usage. Here are some recommended practices of using Dedup table.
Create the Kafka topic with more partitions. The number of Kafka partitions determines the partition numbers of the Pinot table. The more partitions you have in the Kafka topic, more Pinot servers you can distribute the Pinot table to and therefore more you can scale the table horizontally.
Dedup table maintains an in-memory map from the primary key to the segment reference. So it's recommended to use a simple primary key type and avoid composite primary keys to save the memory cost. In addition, consider the hashFunction config in the Dedup config, which can be MD5 or MURMUR3, to store the 128-bit hashcode of the primary key instead. This is useful when your primary key takes more space. But keep in mind, this hash may introduce collisions, though the chance is very low.
Monitoring: Set up a dashboard over the metric pinot.server.dedupPrimaryKeysCount.tableName to watch the number of primary keys in a table partition. It's useful for tracking its growth which is proportional to the memory usage growth.
Capacity planning: It's useful to plan the capacity beforehand to ensure you will not run into resource constraints later. A simple way is to measure the amount of the primary keys in the Kafka throughput per partition and time the primary key space cost to approximate the memory usage. A heap dump is also useful to check the memory usage so far on an dedup table instance.
To reload a specific segment from a table, use:
A successful API call returns the following response:
Use the Pinot Admin Console to reload segments
To use the Pinot Admin Console, do the following:
From the left navigation menu, select Cluster Manager.
Under TENANTS, select the Tenant Name.
From the list of tables in the tenant, select the Table Name.
Do one of the following:
To reload all segments, under OPERATIONS, click Reload All Segments.
To reload a specific segment, under SEGMENTS, select the Segment Name, and then in the new OPERATIONS section, select Reload Segment.
#CONTROLLER

pinot.controller.storage.factory.class.[scheme]=className of the pinot file system
pinot.controller.segment.fetcher.protocols=file,http,[scheme]
pinot.controller.segment.fetcher.[scheme].class=org.apache.pinot.common.utils.fetcher.PinotFSSegmentFetcher
#SERVER

pinot.server.storage.factory.class.[scheme]=className of the Pinot file system
pinot.server.segment.fetcher.protocols=file,http,[scheme]
pinot.server.segment.fetcher.[scheme].class=org.apache.pinot.common.utils.fetcher.PinotFSSegmentFetcher
This guide shows you how to ingest a stream of records from an Amazon Kinesis topic into a Pinot table.
To ingest events from an Amazon Kinesis stream into Pinot, set the following configs into the table config:
where the Kinesis specific properties are:
Property
Description
streamType
This should be set to "kinesis"
stream.kinesis.topic.name
Kinesis stream name
Kinesis supports authentication using the . The credential provider looks for the credentials in the following order -
Environment Variables - AWS_ACCESS_KEY_ID and AWS_SECRET_ACCESS_KEY (RECOMMENDED since they are recognized by all the AWS SDKs and CLI except for .NET), or AWS_ACCESS_KEY and AWS_SECRET_KEY (only recognized by Java SDK)
Java System Properties - aws.accessKeyId and aws.secretKey
Although you can also specify the accessKey and secretKey in the properties above, we don't recommend this unsecure method. We recommend using it only for non-production proof-of-concept (POC) setups. You can also specify other AWS fields such as AWS_SESSION_TOKEN as environment variables and config and it will work.
Limitations
ShardID is of the format "shardId-000000000001". We use the numeric part as partitionId. Our partitionId variable is integer. If shardIds grow beyond Integer.MAX\_VALUE, we will overflow into the partitionId space.
Segment size based thresholds for segment completion will not work. It assumes that partition "0" always exists. However, once the shard 0 is split/merged, we will no longer have partition 0.
Import Data
This page lists options for importing data into Pinot with links to detailed instructions with examples.
There are multiple options for importing data into Pinot. The pages in this section provide step-by-step instructions for importing records into Pinot, supported by our plugin architecture. The intent is to get you up and running with imported data as quickly as possible.
Pinot supports multiple file input formats without needing to change anything other than the file name. Each example imports a ready-made dataset so you can see how things work without needing to find or create your own dataset.
Pinot Batch Ingestion
These guides show you how to import data from popular big data platforms.
Pinot Stream Ingestion
This guide shows you how to import data using stream ingestion from Apache Kafka topics.
This guide shows you how to import data using stream ingestion with upsert.
This guide shows you how to import data using stream ingestion with deduplication.
This guide shows you how to import data using stream ingestion with CLP.
Pinot file systems
By default, Pinot does not come with a storage layer, so all the data sent won't be stored in case of system crash. In order to persistently store the generated segments, you will need to change controller and server configs to add a deep storage. See for all the info and related configs.
These guides show you how to import data and persist it in these file systems.
Pinot input formats
This guide shows you how to import data from various Pinot-supported input formats.
This guide shows you how to handle the complex type in the ingested data, such as map and array.
Reloading and uploading existing Pinot segments
This guide shows you how to reload Pinot segments from your deep store.
This guide shows you how to upload Pinot segments from an old, closed Pinot instance.
Upload a table segment
Upload a table segment in Apache Pinot.
This procedure uploads one or more table segments that have been stored as Pinot segment binary files outside of Apache Pinot, such as if you had to close an original Pinot cluster and create a new one.
Choose one of the following:
If your data is in a location that uses HDFS, create a segment fetcher.
If your data is on a host where you have SSH access, use the Pinot Admin script.
Web Identity Token credentials from the environment or container
Credential profiles file at the default location (~/.aws/credentials) shared by all AWS SDKs and the AWS CLI
Credentials delivered through the Amazon EC2 container service if AWS_CONTAINER_CREDENTIALS_RELATIVE_URI environment variable is set and security manager has permission to access the variable,
Instance profile credentials delivered through the Amazon EC2 metadata service
region
Kinesis region e.g. us-west-1
accessKey
Kinesis access key
secretKey
Kinesis secret key
shardIteratorType
Set to LATEST to consume only new records, TRIM_HORIZON for earliest sequence number_,_ AT___SEQUENCE_NUMBER and AFTER_SEQUENCE_NUMBER to start consumptions from a particular sequence number
If the data is in a location using HDFS, you can create a segment fetcher, which will push segment files from external systems such as those running Hadoop or Spark. It is possible to implement your own segment fetcher for other systems with an external jar by implementing a class that extends this interface.
Use the Pinot Admin script to upload segments
To do this, you need to create a JobSpec configuration file. For details, see Ingestion job spec. This file defines the job, including things like the job type, the input directory or URI, and the table name that the segments will be connected to.
You can upload a Pinot segment using several methods:
Segment tar push
Segment URI push
Segment metadata push
Segment tar push
This is the original and default push mechanism. It requires the segment to be stored locally, or that the segment can be opened as an InputStream on PinotFS, so we can stream the entire segment tar file to the controller.
The push job will upload the entire segment tar file to the Pinot controller.
The Pinot controller will save the segment into the controller segment directory (Local or any PinotFS), then extract segment metadata, and add the segment to the table.
While you can create a JobSpec for this job, in simple instances you can push without one.
Upload segment files to your Pinot server from controller using the Pinot Admin script as follows:
All options should be prefixed with - (hyphen)
Option
Description
controllerHost
Hostname or IP address of the controller
controllerPort
Port of the controller
segmentDir
Local directory containing segment files
tableName
Name of the table to push the segments into
Segment URI push
This push mechanism requires the segment tar file stored on a deep store with a globally accessible segment tar URI.
URI push is lightweight on the client-side, and the controller side requires equivalent work as the tar push.
The push job posts this segment tar URI to the Pinot controller.
The Pinot controller saves the segment into the controller segment directory (local or any PinotFS), then extracts segment metadata, and adds the segment to the table.
Upload segment files to your Pinot server using the JobSpec you create and the Pinot Admin script as follows:
Segment metadata push
This push mechanism also requires the segment tar file stored on a deep store with a globally accessible segment tar URI.
Metadata push is lightweight on the controller side. There is no deep store download involved from the controller side.
The push job downloads the segment based on URI, then extracts metadata, and upload metadata to the Pinot controller.
The Pinot controller adds the segment to the table based on the metadata.
Upload segment metadata to your Pinot server using the JobSpec you create and the Pinot Admin script as follows:
Batch ingestion of data into Apache Pinot using Apache Hadoop.
Segment Creation and Push
Pinot supports Apache Hadoop as a processor to create and push segment files to the database. Pinot distribution is bundled with the Spark code to process your files and convert and upload them to Pinot.
You can follow the wiki to build Pinot from source. The resulting JAR file can be found in pinot/target/pinot-all-${PINOT_VERSION}-jar-with-dependencies.jar
Next, you need to change the execution config in the job spec to the following -
You can check out the sample job spec here.
Finally execute the hadoop job using the command -
Ensure environment variables PINOT_ROOT_DIR and PINOT_VERSION are set properly.
Data Preprocessing before Segment Creation
We’ve seen some requests that data should be massaged (like partitioning, sorting, resizing) before creating and pushing segments to Pinot.
The MapReduce job called SegmentPreprocessingJob would be the best fit for this use case, regardless of whether the input data is of AVRO or ORC format.
Check the below example to see how to use SegmentPreprocessingJob.
In Hadoop properties, set the following to enable this job:
In table config, specify the operations in preprocessing.operations that you'd like to enable in the MR job, and then specify the exact configs regarding those operations:
preprocessing.num.reducers
Minimum number of reducers. Optional. Fetched when partitioning gets disabled and resizing is enabled. This parameter is to avoid having too many small input files for Pinot, which leads to the case where Pinot server is holding too many small segments, causing too many threads.
preprocessing.max.num.records.per.file
Maximum number of records per reducer. Optional.Unlike, “preprocessing.num.reducers”, this parameter is to avoid having too few large input files for Pinot, which misses the advantage of muti-threading when querying. When not set, each reducer will finally generate one output file. When set (e.g. M), the original output file will be split into multiple files and each new output file contains at most M records. It does not matter whether partitioning is enabled or not.
For more details on this MR job, refer to this .
Google Cloud Storage
This guide shows you how to import data from GCP (Google Cloud Platform).
Enable the Google Cloud Storage using the pinot-gcs plugin. In the controller or server, add the config:
By default Pinot loads all the plugins, so you can just drop this plugin there. Also, if you specify -Dplugins.include, you need to put all the plugins you want to use, e.g. pinot-json, pinot-avro , pinot-kafka-2.0...
GCP file systems provides the following options:
projectId - The name of the Google Cloud Platform project under which you have created your storage bucket.
gcpKey - Location of the json file containing GCP keys. You can refer to download the keys.
Each of these properties should be prefixed by pinot.[node].storage.factory.class.gs. where node is either controller or server depending on the configuration, like this:
Examples
Job spec
Controller config
Server config
Minion config
Amazon S3
This guide shows you how to import data from files stored in Amazon S3.
Enable the file system backend by including the pinot-s3 plugin. In the controller or server configuration, add the config:
By default Pinot loads all the plugins, so you can just drop this plugin there. Also, if you specify -Dplugins.include, you need to put all the plugins you want to use, e.g. pinot-json, pinot-avro ,
# executionFrameworkSpec: Defines ingestion jobs to be running.
executionFrameworkSpec:

    # name: execution framework name
  name: 'hadoop'

  # segmentGenerationJobRunnerClassName: class name implements org.apache.pinot.spi.ingestion.batch.runner.IngestionJobRunner interface.
  segmentGenerationJobRunnerClassName: 'org.apache.pinot.plugin.ingestion.batch.hadoop.HadoopSegmentGenerationJobRunner'

  # segmentTarPushJobRunnerClassName: class name implements org.apache.pinot.spi.ingestion.batch.runner.IngestionJobRunner interface.
  segmentTarPushJobRunnerClassName: 'org.apache.pinot.plugin.ingestion.batch.hadoop.HadoopSegmentTarPushJobRunner'

  # segmentUriPushJobRunnerClassName: class name implements org.apache.pinot.spi.ingestion.batch.runner.IngestionJobRunner interface.
  segmentUriPushJobRunnerClassName: 'org.apache.pinot.plugin.ingestion.batch.hadoop.HadoopSegmentUriPushJobRunner'

  # segmentMetadataPushJobRunnerClassName: class name implements org.apache.pinot.spi.ingestion.batch.runner.IngestionJobRunner interface.
  segmentMetadataPushJobRunnerClassName: 'org.apache.pinot.plugin.ingestion.batch.hadoop.HadoopSegmentMetadataPushJobRunner'

    # extraConfigs: extra configs for execution framework.
  extraConfigs:

    # stagingDir is used in distributed filesystem to host all the segments then move this directory entirely to output directory.
    stagingDir: your/local/dir/staging
You can configure the S3 file system using the following options:
Configuration
Description
region
The AWS Data center region in which the bucket is located
accessKey
(Optional) AWS access key required for authentication. This should only be used for testing purposes as we don't store these keys in secret.
secretKey
(Optional) AWS secret key required for authentication. This should only be used for testing purposes as we don't store these keys in secret.
endpoint
(Optional) Override endpoint for s3 client.
disableAcl
If this is set tofalse, bucket owner is granted full access to the objects created by pinot. Default value is true.
Each of these properties should be prefixed by pinot.[node].storage.factory.s3. where node is either controller or server depending on the config
e.g.
S3 Filesystem supports authentication using the DefaultCredentialsProviderChain. The credential provider looks for the credentials in the following order -
Environment Variables - AWS_ACCESS_KEY_ID and AWS_SECRET_ACCESS_KEY (RECOMMENDED since they are recognized by all the AWS SDKs and CLI except for .NET), or AWS_ACCESS_KEY and AWS_SECRET_KEY (only recognized by Java SDK)
Java System Properties - aws.accessKeyId and aws.secretKey
Web Identity Token credentials from the environment or container
Credential profiles file at the default location (~/.aws/credentials) shared by all AWS SDKs and the AWS CLI
Credentials delivered through the Amazon EC2 container service if AWS_CONTAINER_CREDENTIALS_RELATIVE_URI environment variable is set and security manager has permission to access the variable,
Instance profile credentials delivered through the Amazon EC2 metadata service
You can also specify the accessKey and secretKey using the properties. However, this method is not secure and should be used only for POC setups.
This guide shows you how to ingest a stream of records from an Apache Pulsar topic into a Pinot table.
Pinot supports consuming data from Apache Pulsar via the pinot-pulsar plugin. You need to enable this plugin so that Pulsar specific libraries are present in the classpath.
Enable the Pulsar plugin with the following config at the time of Pinot setup: -Dplugins.include=pinot-pulsar
The pinot-pulsar plugin is not part of official 0.10.0 binary. You can download the plugin from and add it to the libs or plugins directory in pinot.
Set up Pulsar table
Here is a sample Pulsar stream config. You can use the streamConfigs section from this sample and make changes for your corresponding table.
Pulsar configuration options
You can change the following Pulsar specifc configurations for your tables
Property
Description
Authentication
The Pinot-Pulsar connector supports authentication using the security tokens. You can generate the token by following the . Once generated, you can add the following property to streamConfigs to add auth token for each request
TLS support
The Pinot-pulsar connector also supports TLS for encrypted connections. You can follow to enable TLS on your pulsar cluster. Once done, you can enable TLS in pulsar connector by providing the trust certificate file location generated in the previous step.
Also, make sure to change the brokers url from pulsar://localhost:6650 to pulsar+ssl://localhost:6650 so that secure connections are used.
For other table and stream configurations, you can headover to
Supported Pulsar versions
Pinot currently relies on Pulsar client version 2.7.2. Make sure the Pulsar broker is compatible with the this client version.
Extract record headers as Pinot table columns
Pinot's Pulsar connector supports automatically extracting record headers and metadata into the Pinot table columns. Pulsar supports a large amount of per-record metadata. Please reference the for the meaning of the metadata fields.
The following table shows the mapping for record header/metadata to Pinot table column names:
Pulsar Message
Pinot table Column
Comments
Available By Default
In order to enable the metadata extraction in a Pulsar table, set the stream config metadata.populate to true. The fields eventTime, publishTime, brokerPublishTime, and key are populated by default. If you would like to extract additional fields from the Pulsar Message, populate the metadataFields config with a comma separated list of fields to populate. The fields are referenced by the field name in the Pulsar Message. For example, setting:
Will make the __metadata$messageId, __metadata$messageBytes, __metadata$eventTime, and __metadata$topicName, fields available for mapping to columns in the Pinot schema.
In addition to this, if you want to use any of these columns in your table, you have to list them explicitly in your table's schema.
For example, if you want to add only the offset and key as dimension columns in your Pinot table, it can listed in the schema as follows:
Once the schema is updated, these columns are similar to any other pinot column. You can apply ingestion transforms and / or define indexes on them.
Remember to follow the when updating schema of an existing table!
Batch Ingestion
Batch ingestion of data into Apache Pinot.
With batch ingestion you create a table using data already present in a file system such as S3. This is particularly useful when you want to use Pinot to query across large data with minimal latency or to test out new features using a simple data file.
To ingest data from a filesystem, perform the following steps, which are described in more detail in this page:
Create schema configuration
Create table configuration
Upload schema and table configs
Upload data
Batch ingestion currently supports the following mechanisms to upload the data:
Standalone
Here's an example using standalone local processing.
First, create a table using the following CSV data.
Create schema configuration
In our data, the only column on which aggregations can be performed is score. Secondly, timestampInEpoch is the only timestamp column. So, on our schema, we keep score as metric and timestampInEpoch as timestamp column.
Here, we have also defined two extra fields: format and granularity. The format specifies the formatting of our timestamp column in the data source. Currently, it's in milliseconds, so we've specified 1:MILLISECONDS:EPOCH.
Create table configuration
We define a table transcript and map the schema created in the previous step to the table. For batch data, we keep the tableType as OFFLINE.
Upload schema and table configs
Now that we have both the configs, upload them and create a table by running the following command:
Check out the table config and schema in the \[Rest API] to make sure it was successfully uploaded.
Upload data
We now have an empty table in Pinot. Next, upload the CSV file to this empty table.
A table is composed of multiple segments. The segments can be created in the following three ways:
Minion based ingestion\
Upload API\
Ingestion jobs
Minion-based ingestion
Refer to
Upload API
There are 2 controller APIs that can be used for a quick ingestion test using a small file.
When these APIs are invoked, the controller has to download the file and build the segment locally.
Hence, these APIs are NOT meant for production environments and for large input files.
/ingestFromFile
This API creates a segment using the given file and pushes it to Pinot. All steps happen on the controller.
Example usage:
To upload a JSON file data.json to a table called foo_OFFLINE, use below command
Note that query params need to be URLEncoded. For example, {"inputFormat":"json"} in the command below needs to be converted to %7B%22inputFormat%22%3A%22json%22%7D.
The batchConfigMapStr can be used to pass in additional properties needed for decoding the file. For example, in case of csv, you may need to provide the delimiter
/ingestFromURI
This API creates a segment using file at the given URI and pushes it to Pinot. Properties to access the FS need to be provided in the batchConfigMap. All steps happen on the controller.
Example usage:
Ingestion jobs
Segments can be created and uploaded using tasks known as DataIngestionJobs. A job also needs a config of its own. We call this config the JobSpec.
For our CSV file and table, the JobSpec should look like this:
For more detail, refer to .
Now that we have the job spec for our table transcript, we can trigger the job using the following command:
Once the job successfully finishes, head over to the \[query console] and start playing with the data.
Segment push job type
There are 3 ways to upload a Pinot segment:
Segment tar push
Segment URI push
Segment metadata push
Segment tar push
This is the original and default push mechanism.
Tar push requires the segment to be stored locally or can be opened as an InputStream on PinotFS. So we can stream the entire segment tar file to the controller.
The push job will:
Upload the entire segment tar file to the Pinot controller.
Pinot controller will:
Save the segment into the controller segment directory(Local or any PinotFS).
Extract segment metadata.
Add the segment to the table.
Segment URI push
This push mechanism requires the segment tar file stored on a deep store with a globally accessible segment tar URI.
URI push is light-weight on the client-side, and the controller side requires equivalent work as the tar push.
The push job will:
POST this segment tar URI to the Pinot controller.
Pinot controller will:
Download segment from the URI and save it to controller segment directory (local or any PinotFS).
Extract segment metadata.
Add the segment to the table.
Segment metadata push
This push mechanism also requires the segment tar file stored on a deep store with a globally accessible segment tar URI.
Metadata push is light-weight on the controller side, there is no deep store download involves from the controller side.
The push job will:
Download the segment based on URI.
Extract metadata.
Upload metadata to the Pinot Controller.
Pinot Controller will:
Add the segment to the table based on the metadata.
4. Segment Metadata Push with copyToDeepStore
This extends the original Segment Metadata Push for cases, where the segments are pushed to a location not used as deep store. The ingestion job can still do metadata push but ask Pinot Controller to copy the segments into deep store. Those use cases usually happen when the ingestion jobs don't have direct access to deep store but still want to use metadata push for its efficiency, thus using a staging location to keep the segments temporarily.
NOTE: the staging location and deep store have to use same storage scheme, like both on s3. This is because the copy is done via PinotFS.copyDir interface that assumes so; but also because this does copy at storage system side, so segments don't need to go through Pinot Controller at all.
To make this work, grant Pinot controllers access to the staging location. For example on AWS, this may require adding an access policy like this example for the controller EC2 instances:
Then use metadata push to add one extra config like this one:
Consistent data push and rollback
Pinot supports atomic update on segment level, which means that when data consisting of multiple segments are pushed to a table, as segments are replaced one at a time, queries to the broker during this upload phase may produce inconsistent results due to interleaving of old and new data.
See for how to enable this feature.
Segment fetchers
When Pinot segment files are created in external systems (Hadoop/spark/etc), there are several ways to push those data to the Pinot controller and server:
Push segment to shared NFS and let pinot pull segment files from the location of that NFS. See .
Push segment to a Web server and let pinot pull segment files from the Web server with HTTP/HTTPS link. See .
Push segment to PinotFS(HDFS/S3/GCS/ADLS) and let pinot pull segment files from PinotFS URI. See and .
The first three options are supported out of the box within the Pinot package. As long your remote jobs send Pinot controller with the corresponding URI to the files, it will pick up the file and allocate it to proper Pinot servers and brokers. To enable Pinot support for PinotFS, you'll need to provide configuration and proper Hadoop dependencies.
Persistence
By default, Pinot does not come with a storage layer, so all the data sent, won't be stored in case of a system crash. In order to persistently store the generated segments, you will need to change controller and server configs to add deep storage. Checkout for all the info and related configs.
Tuning
Standalone
Since pinot is written in Java, you can set the following basic Java configurations to tune the segment runner job -
Log4j2 file location with -Dlog4j2.configurationFile
Plugin directory location with -Dplugins.dir=/opt/pinot/plugins
JVM props, like -Xmx8g -Xms4G
If you are using the docker, you can set the following under JAVA_OPTS variable.
Hadoop
You can set -D mapreduce.map.memory.mb=8192 to set the mapper memory size when submitting the Hadoop job.
Spark
You can add config spark.executor.memory to tune the memory usage for segment creation when submitting the Spark job.
(Optional) The server-side encryption algorithm used when storing this object in Amazon S3 (Now supports aws:kms), set to null to disable SSE.
ssekmsKeyId
(Optional, but required when serverSideEncryption=aws:kms) Specifies the AWS KMS key ID to use for object encryption. All GET and PUT requests for an object protected by AWS KMS will fail if not made via SSL or using SigV4.
ssekmsEncryptionContext
(Optional) Specifies the AWS KMS Encryption Context to use for object encryption. The value of this header is a base64-encoded UTF-8 string holding JSON with the encryption context key-value pairs.
__metadata$publishTime : String
publish time as determined by the producer
Yes
brokerPublishTime: Optional
__metadata$brokerPublishTime : String
publish time as determined by the broker
Yes
eventTime : Long
__metadata$eventTime : String
Yes
messageId : MessageId -> String
__metadata$messageId : String
String representation of the MessagId field. The format is ledgerId:entryId:partitionIndex
messageId : MessageId -> bytes
__metadata$messageBytes : String
Base64 encoded version of the bytes returned from calling MessageId.toByteArray()
producerName : String
__metadata$producerName : String
schemaVersion : byte[]
__metadata$schemaVersion : String
Base64 encoded value
sequenceId : Long
__metadata$sequenceId : String
orderingKey : byte[]
__metadata$orderingKey : String
Base64 encoded value
size : Integer
__metadata$size : String
topicName : String
__metadata$topicName : String
index : String
__metadata$index : String
redeliveryCount : Integer
__metadata$redeliveryCount : String
streamType
This should be set to "pulsar"
stream.pulsar.topic.name
Your pulsar topic name
stream.pulsar.bootstrap.servers
Comma-separated broker list for Apache Pulsar
stream.pulsar.metadata.populate
set to true to populate metadata
stream.pulsar.metadata.fields
set to comma separated list of metadata fields
key : String
__key : String
Yes
properties : Map<String, String>
Each header key is listed as a separate column: __header$HeaderKeyName : String
Commonly, ingested data has a complex structure. For example, Avro schemas have records and arrays while JSON supports objects and arrays.
Apache Pinot's data model supports primitive data types (including int, long, float, double, BigDecimal, string, bytes), and limited multi-value types, such as an array of primitive types. Simple data types allow Pinot to build fast indexing structures for good query performance, but does require some handling of the complex structures.
There are two options for complex type handling:
Convert the complex-type data into a JSON string and then build a JSON index.
Use the built-in complex-type handling rules in the ingestion configuration.
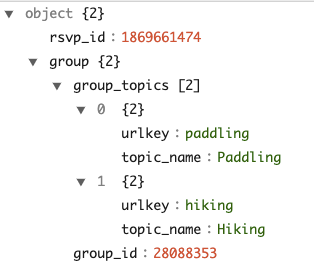
On this page, we'll show how to handle these complex-type structures with each of these two approaches. We will process some example data, consisting of the field group from the .
This object has two child fields and the child group is a nested array with elements of object type.
JSON indexing
Apache Pinot provides a powerful to accelerate the value lookup and filtering for the column. To convert an object group with complex type to JSON, add the following to your table configuration.
The config transformConfigs transforms the object group to a JSON string group_json, which then creates the JSON indexing with configuration jsonIndexColumns. To read the full spec, see .
Also, note that group is a reserved keyword in SQL and therefore needs to be quoted in transformFunction.
The columnName can't use the same name as any of the fields in the source JSON data, for example, if our source data contains the field group and we want to transform the data in that field before persisting it, the destination column name would need to be something different, like group_json.
Note that you do not need to worry about the maxLength of the field group_json on the schema, because "JSON" data type does not have a maxLength and will not be truncated. This is true even though "JSON" is stored as a string internally.
The schema will look like this:
For the full specification, see .
With this, you can start to query the nested fields under group. For more details about the supported JSON function, see ).
Ingestion configurations
Though JSON indexing is a handy way to process the complex types, there are some limitations:
It’s not performant to group by or order by a JSON field, because JSON_EXTRACT_SCALAR is needed to extract the values in the GROUP BY and ORDER BY clauses, which invokes the function evaluation.
It does not work with Pinot's such as DISTINCTCOUNTMV.
Alternatively, from Pinot 0.8, you can use the complex-type handling in ingestion configurations to flatten and unnest the complex structure and convert them into primitive types. Then you can reduce the complex-type data into a flattened Pinot table, and query it via SQL. With the built-in processing rules, you do not need to write ETL jobs in another compute framework such as Flink or Spark.
To process this complex type, you can add the configuration complexTypeConfig to the ingestionConfig. For example:
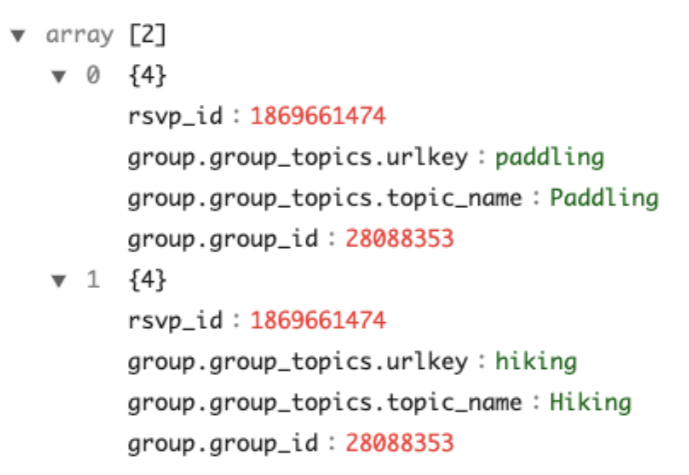
With the complexTypeConfig , all the map objects will be flattened to direct fields automatically. And with unnestFields , a record with the nested collection will unnest into multiple records. For instance, the example at the beginning will transform into two rows with this configuration example.
Note that:
The nested field group_id under group is flattened to group.group_id. The default value of the delimiter is . You can choose another delimiter by specifying the configuration delimiter under complexTypeConfig. This flattening rule also applies to maps in the collections to be unnested.
You can find the full specifications of the table config and the table schema .
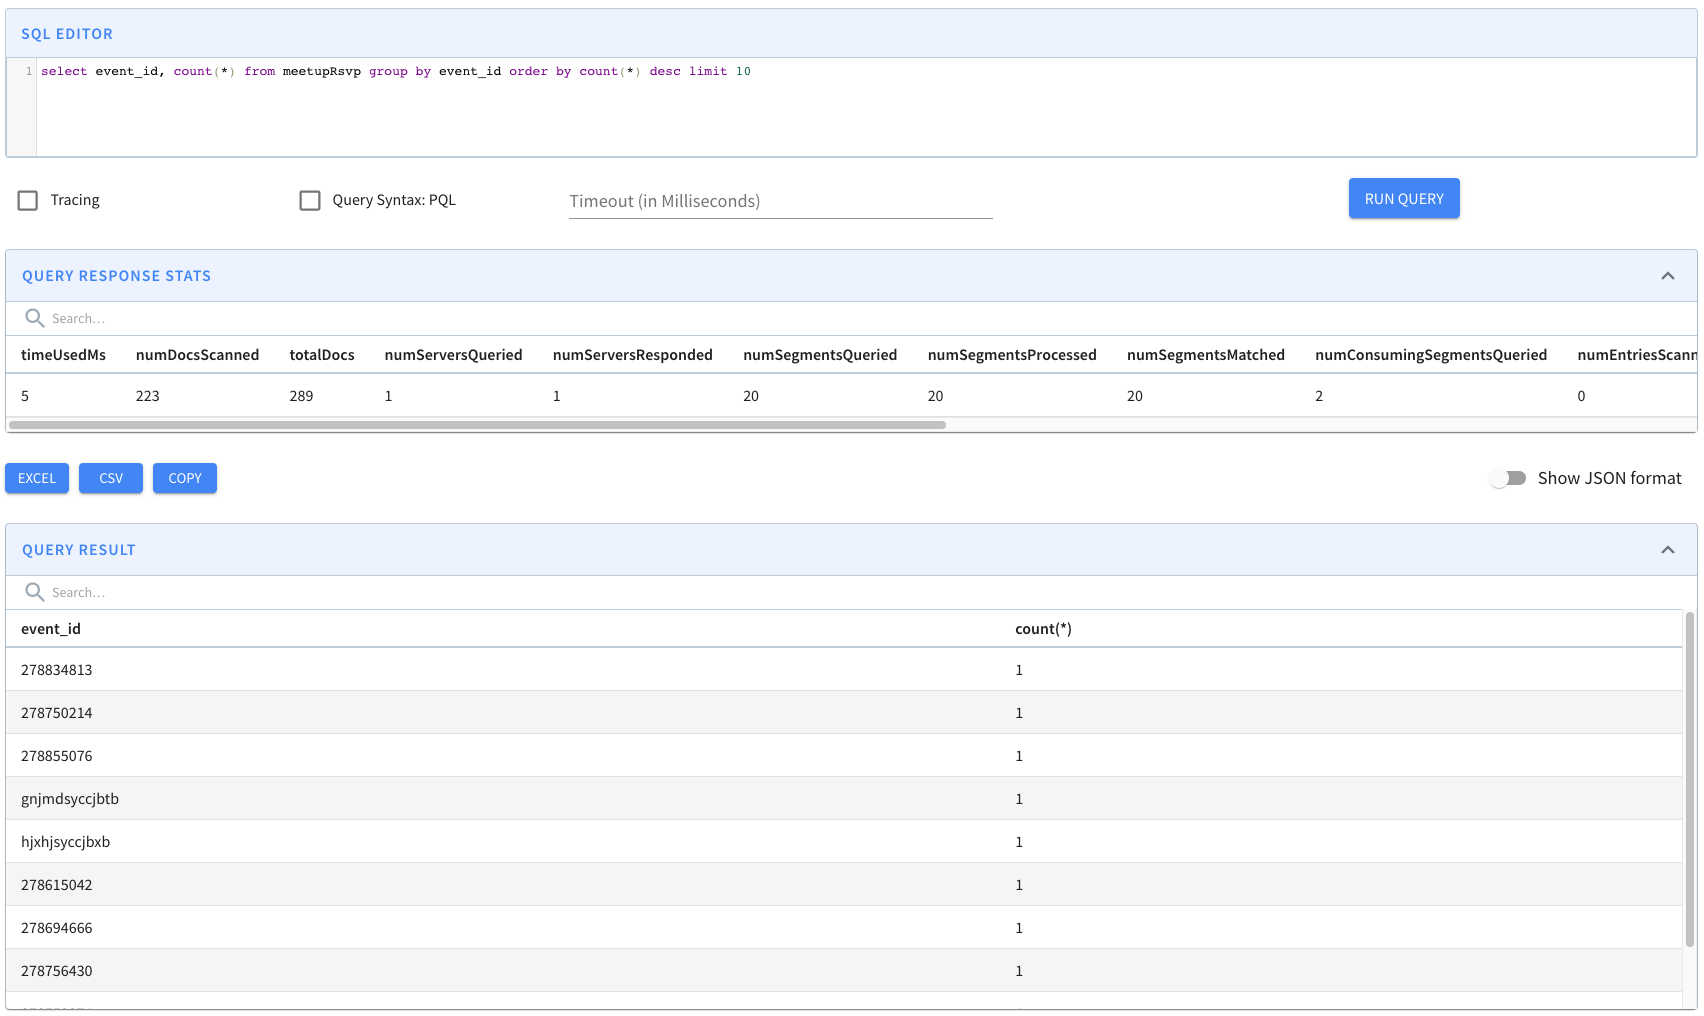
You can then query the table with primitive values using the following SQL query:
. is a reserved character in SQL, so you need to quote the flattened columns in the query.
Infer the Pinot schema from the Avro schema and JSON data
When there are complex structures, it can be challenging and tedious to figure out the Pinot schema manually. To help with schema inference, Pinot provides utility tools to take the Avro schema or JSON data as input and output the inferred Pinot schema.
To infer the Pinot schema from Avro schema, you can use a command like this:
Note you can input configurations like fieldsToUnnest similar to the ones in complexTypeConfig. And this will simulate the complex-type handling rules on the Avro schema and output the Pinot schema in the file specified in outputDir.
Similarly, you can use the command like the following to infer the Pinot schema from a file of JSON objects.
You can check out an example of this run in this .
The nested array group_topics under group is unnested into the top-level, and converts the output to a collection of two rows. Note the handling of the nested field within group_topics, and the eventual top-level field of group.group_topics.urlkey. All the collections to unnest shall be included in the configuration fieldsToUnnest.
Collections not specified in fieldsToUnnestwill be serialized into JSON string, except for the array of primitive values, which will be ingested as a multi-value column by default. The behavior is defined by the collectionNotUnnestedToJson config, which takes the following values:
NON_PRIMITIVE- Converts the array to a multi-value column. (default)
ALL- Converts the array of primitive values to JSON string.
This guide shows you how to ingest a stream of records from an Apache Kafka topic into a Pinot table.
In this page, you'll learn how to import data into Pinot using Apache Kafka for real-time stream ingestion. Pinot has out-of-the-box real-time ingestion support for Kafka.
Let's set up a demo Kafka cluster locally, and create a sample topic transcript-topic
Start Kafka
dockerrun\--networkpinot-demo--name=kafka
Create a Kafka topic
dockerexec\-tkafka\
Start Kafka
Start Kafka cluster on port 9092 using the same Zookeeper from the .
Create a Kafka topic
Download the latest . Create a topic.
Create schema configuration
We will publish the data in the same format as mentioned in the docs. So you can use the same schema mentioned under .
Create table configuration
The real-time table configuration for the transcript table described in the schema from the previous step.
For Kafka, we use streamType as kafka . See for available decoder class options. You can also write your own decoder by extending the StreamMessageDecoder interface and putting the jar file in plugins directory.
The lowLevel consumer reads data per partition whereas the highLevel consumer utilises Kafka high level consumer to read data from the whole stream. It doesn't have the control over which partition to read at a particular momemt.
For Kafka versions below 2.X, use org.apache.pinot.plugin.stream.kafka09.KafkaConsumerFactory
For Kafka version 2.X and above, use
org.apache.pinot.plugin.stream.kafka20.KafkaConsumerFactory
You can set the offset to -
smallest to start consumer from the earliest offset
largest to start consumer from the latest offset
timestamp in format yyyy-MM-dd'T'HH:mm:ss.SSSZ
The resulting configuration should look as follows -
Upload schema and table
Now that we have our table and schema configurations, let's upload them to the Pinot cluster. As soon as the real-time table is created, it will begin ingesting available records from the Kafka topic.
Add sample data to the Kafka topic
We will publish data in the following format to Kafka. Let us save the data in a file named as transcript.json.
Push sample JSON into the transcript-topic Kafka topic, using the Kafka console producer. This will add 12 records to the topic described in the transcript.json file.
Checkin Kafka docker container
Publish messages to the target topic
Query the table
As soon as data flows into the stream, the Pinot table will consume it and it will be ready for querying. Head over to the to checkout the real-time data.
Kafka ingestion guidelines
Kafka versions in Pinot
Pinot supports 2 major generations of Kafka library - kafka-0.9 and kafka-2.x for both high and low level consumers.
Post release 0.10.0, we have started shading kafka packages inside Pinot. If you are using our latest tagged docker images or master build, you should replace org.apache.kafka with shaded.org.apache.kafka in your table config.
Upgrade from Kafka 0.9 connector to Kafka 2.x connector
Update table config for both high level and low level consumer: Update config: stream.kafka.consumer.factory.class.name from org.apache.pinot.core.realtime.impl.kafka.KafkaConsumerFactory to org.apache.pinot.core.realtime.impl.kafka2.KafkaConsumerFactory.
If using Stream(High) level consumer, also add config stream.kafka.hlc.bootstrap.server into tableIndexConfig.streamConfigs. This config should be the URI of Kafka broker lists, e.g.
How to consume from a Kafka version > 2.0.0
This connector is also suitable for Kafka lib version higher than 2.0.0. In , change the kafka.lib.version from 2.0.0 to 2.1.1 will make this Connector working with Kafka 2.1.1.
Kafka configurations in Pinot
Use Kafka partition (low) level consumer with SSL
Here is an example config which uses SSL based authentication to talk with kafka and schema-registry. Notice there are two sets of SSL options, ones starting with ssl. are for kafka consumer and ones with stream.kafka.decoder.prop.schema.registry. are for SchemaRegistryClient used by KafkaConfluentSchemaRegistryAvroMessageDecoder.
Consume transactionally-committed messages
The connector with Kafka library 2.0+ supports Kafka transactions. The transaction support is controlled by config kafka.isolation.level in Kafka stream config, which can be read_committed or read_uncommitted (default). Setting it to read_committed will ingest transactionally committed messages in Kafka stream only.
For example,
Note that the default value of this config read_uncommitted to read all messages. Also, this config supports low-level consumer only.
Use Kafka partition (low) level consumer with SASL_SSL
Here is an example config which uses SASL_SSL based authentication to talk with kafka and schema-registry. Notice there are two sets of SSL options, some for kafka consumer and ones with stream.kafka.decoder.prop.schema.registry. are for SchemaRegistryClient used by KafkaConfluentSchemaRegistryAvroMessageDecoder.
Extract record headers as Pinot table columns
Pinot's Kafka connector supports automatically extracting record headers and metadata into the Pinot table columns. The following table shows the mapping for record header/metadata to Pinot table column names:
Kafka Record
Pinot Table Column
Description
In order to enable the metadata extraction in a Kafka table, you can set the stream config metadata.populate to true.
In addition to this, if you want to use any of these columns in your table, you have to list them explicitly in your table's schema.
For example, if you want to add only the offset and key as dimension columns in your Pinot table, it can listed in the schema as follows:
Once the schema is updated, these columns are similar to any other pinot column. You can apply ingestion transforms and / or define indexes on them.
Remember to follow the when updating schema of an existing table!
Tell Pinot where to find an Avro schema
There is a standalone utility to generate the schema from an Avro file. See [infer the pinot schema from the avro schema and JSON data]() for details.
To avoid errors like The Avro schema must be provided, designate the location of the schema in your streamConfigs section. For example, if your current section contains the following:
Then add this key: "stream.kafka.decoder.prop.schema"followed by a value that denotes the location of your schema.
Input formats
This section contains a collection of guides that will show you how to import data from a Pinot-supported input format.
Pinot offers support for various popular input formats during ingestion. By changing the input format, you can reduce the time spent doing serialization-deserialization and speed up the ingestion.
Configuring input formats
To change the input format, adjust the recordReaderSpec config in the ingestion job specification.
to start the consumer from the offset after the timestamp.
datetime duration or period to start the consumer from the offset after the period eg., '2d'.
className: Name of the class that implements the RecordReader interface. This class is used for parsing the data.
configClassName: Name of the class that implements the RecordReaderConfig interface. This class is used the parse the values mentioned in configs
configs: Key-value pair for format-specific configurations. This field is optional.
Supported input formats
Pinot supports multiple input formats out of the box. Specify the corresponding readers and the associated custom configurations to switch between formats.
CSV
CSV Record Reader supports the following configs:
fileFormat: default, rfc4180, excel, tdf, mysql
header: Header of the file. The columnNames should be separated by the delimiter mentioned in the configuration.
delimiter: The character seperating the columns.
multiValueDelimiter: The character separating multiple values in a single column. This can be used to split a column into a list.
skipHeader: Skip header record in the file. Boolean.
ignoreEmptyLines: Ignore empty lines (instead of filling them with default values). Boolean.
ignoreSurroundingSpaces: ignore spaces around column names and values. Boolean
quoteCharacter: Single character used for quotes in CSV files.
recordSeparator: Character used to separate records in the input file. Default is or \r depending on the platform.
nullStringValue: String value that represents null in CSV files. Default is empty string.
skipUnParseableLines : Skip lines that cannot be parsed. Note that this would result in data loss. Boolean.
Your CSV file may have raw text fields that cannot be reliably delimited using any character. In this case, explicitly set the multiValueDelimeter field to empty in the ingestion config.
multiValueDelimiter: ''
Avro
The Avro record reader converts the data in file to a GenericRecord. A Java class or .avro file is not required. By default, the Avro record reader only supports primitive types. To enable support for rest of the Avro data types, set enableLogicalTypes to true .
We use the following conversion table to translate between Avro and Pinot data types. The conversions are done using the offical Avro methods present in org.apache.avro.Conversions.
Avro Data Type
Pinot Data Type
Comment
INT
INT
LONG
LONG
FLOAT
FLOAT
JSON
Thrift
Thrift requires the generated class using .thrift file to parse the data. The .class file should be available in the Pinot's classpath. You can put the files in the lib/ folder of Pinot distribution directory.
Parquet
Since 0.11.0 release, the Parquet record reader determines whether to use ParquetAvroRecordReader or ParquetNativeRecordReader to read records. The reader looks for the parquet.avro.schema or avro.schema key in the parquet file footer, and if present, uses the Avro reader.
You can change the record reader manually in case of a misconfiguration.
For the support of DECIMAL and other parquet native data types, always use ParquetNativeRecordReader.
INT96
LONG
ParquetINT96 type converts nanoseconds
to Pinot INT64 type of milliseconds
INT64
LONG
INT32
INT
FLOAT
FLOAT
DOUBLE
For ParquetAvroRecordReader , you can refer to the Avro section above for the type conversions.
ORC
ORC record reader supports the following data types -
ORC Data Type
Java Data Type
BOOLEAN
String
SHORT
Integer
INT
Integer
LONG
Integer
FLOAT
Float
In LIST and MAP types, the object should only belong to one of the data types supported by Pinot.
Protocol Buffers
The reader requires a descriptor file to deserialize the data present in the files. You can generate the descriptor file (.desc) from the .proto file using the command -
This guide shows you how to ingest a stream of records into a Pinot table.
Apache Pinot lets users consume data from streams and push it directly into the database. This process is called stream ingestion. Stream ingestion makes it possible to query data within seconds of publication.
Stream ingestion provides support for checkpoints for preventing data loss.
To set up Stream ingestion, perform the following steps, which are described in more detail in this page:
Create schema configuration
Create table configuration
Create ingestion configuration
Upload table and schema spec
Here's an example where we assume the data to be ingested is in the following format:
Create schema configuration
The schema defines the fields along with their data types. The schema also defines whether fields serve as dimensions , metrics, or timestamp. For more details on schema configuration, see .
For our sample data, the schema configuration looks like this:
Create table configuration
The next step is to create a table where all the ingested data will flow and can be queried. For details about each table component, see the reference.
Create ingestion configuration
The ingestion configuration (ingestionConfig) specifies how to ingest streaming data into Pinot. First, include a subsection for streamConfigMaps. Next, decide whether to skip table errors with _continueOnError and whether to validate time values with rowTimeValueCheck and _segmentTimeValueCheck. See details about these ingestionConfig configuration options the streamConfigMaps and Additional ingestion configs tables below:
Information about streamConfigMaps
Additional ingestion configurations
Config key
Description
Example table config with ingestionConfig
For our sample data and schema, the table config will look like this:
Upload schema and table config
Now that we have our table and schema configurations, let's upload them to the Pinot cluster. As soon as the configs are uploaded, Pinot will start ingesting available records from the topic.
Tune the stream config
Throttle stream consumption
There are some scenarios where the message rate in the input stream can come in bursts which can lead to long GC pauses on the Pinot servers or affect the ingestion rate of other real-time tables on the same server. If this happens to you, throttle the consumption rate during stream ingestion to better manage overall performance.
Stream consumption throttling can be tuned using the stream config topic.consumption.rate.limit which indicates the upper bound on the message rate for the entire topic.
Here is the sample configuration on how to configure the consumption throttling:
Some things to keep in mind while tuning this config are:
Since this configuration applied to the entire topic, internally, this rate is divided by the number of partitions in the topic and applied to each partition's consumer.
In case of multi-tenant deployment (where you have more than 1 table in the same server instance), you need to make sure that the rate limit on one table doesn't step on/starve the rate limiting of another table. So, when there is more than 1 table on the same server (which is most likely to happen), you may need to re-tune the throttling threshold for all the streaming tables.
Once throttling is enabled for a table, you can verify by searching for a log that looks similar to:
In addition, you can monitor the consumption rate utilization with the metric COSUMPTION_QUOTA_UTILIZATION.
Note that any configuration change for topic.consumption.rate.limit in the stream config will NOT take effect immediately. The new configuration will be picked up from the next consuming segment. In order to enforce the new configuration, you need to trigger forceCommit APIs. Refer to for more details.
Custom ingestion support
You can also write an ingestion plugin if the platform you are using is not supported out of the box. For a walkthrough, see .
Pause stream ingestion
There are some scenarios in which you may want to pause the real-time ingestion while your table is available for queries. For example, if there is a problem with the stream ingestion and, while you are troubleshooting the issue, you still want the queries to be executed on the already ingested data. For these scenarios, you can first issue a Pause request to a Controller host. After troubleshooting with the stream is done, you can issue another request to Controller to resume the consumption.
When a Pause request is issued, the controller instructs the real-time servers hosting your table to commit their consuming segments immediately. However, the commit process may take some time to complete. Note that Pause and Resume requests are async. An OK response means that instructions for pausing or resuming has been successfully sent to the real-time server. If you want to know if the consumption has actually stopped or resumed, issue a pause status request.
It's worth noting that consuming segments on real-time servers are stored in volatile memory, and their resources are allocated when the consuming segments are first created. These resources cannot be altered if consumption parameters are changed midway through consumption. It may take hours before these changes take effect. Furthermore, if the parameters are changed in an incompatible way (for example, changing the underlying stream with a completely new set of offsets, or changing the stream endpoint from which to consume messages), it will result in the table getting into an error state.
The pause and resume feature is helpful in these instances. When a pause request is issued by the operator, consuming segments are committed without starting new mutable segments. Instead, new mutable segments are started only when the resume request is issued. This mechanism provides the operators as well as developers with more flexibility. It also enables Pinot to be more resilient to the operational and functional constraints imposed by underlying streams.
There is another feature called Force Commit which utilizes the primitives of the pause and resume feature. When the operator issues a force commit request, the current mutable segments will be committed and new ones started right away. Operators can now use this feature for all compatible table config parameter changes to take effect immediately.
(v 0.12.0+) Once submitted, the forceCommit API returns a jobId that can be used to get the current progress of the forceCommit operation. A sample response and status API call:
The forceCommit request just triggers a regular commit before the consuming segments reaching the end criteria, so it follows the same mechanism as regular commit. It is one-time shot request, and not retried automatically upon failure. But it is idempotent so one may keep issuing it till success if needed.
This API is async, as it doesn't wait for the segment commit to complete. But a status entry is put in ZK to track when the request is issued and the consuming segments included. The consuming segments tracked in the status entry are compared with the latest IdealState to indicate the progress of forceCommit. However, this status is not updated or deleted upon commit success or failure, so that it could become stale. Currently, the most recent 100 status entries are kept in ZK, and the oldest ones only get deleted when the total number is about to exceed 100.
For incompatible parameter changes, an option is added to the resume request to handle the case of a completely new set of offsets. Operators can now follow a three-step process: First, issue a pause request. Second, change the consumption parameters. Finally, issue the resume request with the appropriate option. These steps will preserve the old data and allow the new data to be consumed immediately. All through the operation, queries will continue to be served.
Handle partition changes in streams
If a Pinot table is configured to consume using a (partition-based) stream type, then it is possible that the partitions of the table change over time. In Kafka, for example, the number of partitions may increase. In Kinesis, the number of partitions may increase or decrease -- some partitions could be merged to create a new one, or existing partitions split to create new ones.
Pinot runs a periodic task called RealtimeSegmentValidationManager that monitors such changes and starts consumption on new partitions (or stops consumptions from old ones) as necessary. Since this is a that is run on the controller, it may take some time for Pinot to recognize new partitions and start consuming from them. This may delay the data in new partitions appearing in the results that pinot returns.
If you want to recognize the new partitions sooner, then the periodic task so as to recognize such data immediately.
Infer ingestion status of real-time tables
Often, it is important to understand the rate of ingestion of data into your real-time table. This is commonly done by looking at the consumption lag of the consumer. The lag itself can be observed in many dimensions. Pinot supports observing consumption lag along the offset dimension and time dimension, whenever applicable (as it depends on the specifics of the connector).
The ingestion status of a connector can be observed by querying either the /consumingSegmentsInfo API or the table's /debug API, as shown below:
A sample response from a Kafka-based real-time table is shown below. The ingestion status is displayed for each of the CONSUMING segments in the table.
Term
Description
Monitor real-time ingestion
Real-time ingestion includes 3 stages of message processing: Decode, Transform, and Index.
In each of these stages, a failure can happen which may or may not result in an ingestion failure. The following metrics are available to investigate ingestion issues:
Decode stage -> an error here is recorded as INVALID_REALTIME_ROWS_DROPPED
Transform stage -> possible errors here are:
When a message gets dropped due to the transform, it is recorded as REALTIME_ROWS_FILTERED
There is yet another metric called ROWS_WITH_ERROR which is the sum of all error counts in the 3 stages above.
Furthermore, the metric REALTIME_CONSUMPTION_EXCEPTIONS gets incremented whenever there is a transient/permanent stream exception seen during consumption.
These metrics can be used to understand why ingestion failed for a particular table partition before diving into the server logs.
Stream Ingestion with Upsert
Upsert support in Apache Pinot.
Pinot provides native support of upsert during real-time ingestion. There are scenarios where records need modifications, such as correcting a ride fare or updating a delivery status.
Partial upsert is convenient as you only need to specify the columns where values change, and you ignore the rest.
To enable upsert on a Pinot table, make some configuration changes in the table configurations and on the input stream.
Define the primary key in the schema
stream.[streamType].decoder.class.name
Name of class to parse the data. The class should implement the org.apache.pinot.spi.stream.StreamMessageDecoder interface.
Determines the offset from which to start the ingestion
- smallest - largest - timestamp in milliseconds
stream.[streamType].decoder.prop.format
Specifies the data format to ingest via a stream. The value of this property should match the format of the data in the stream.
- JSON
realtime.segment.flush.threshold.time
Maximum elapsed time after which a consuming segment persist. Note that this time should be smaller than the Kafka retention period configured for the corresponding topic.
String, such 1d or 4h30m. Default is 6h (six hours).
realtime.segment.flush.threshold.rows
The maximum number of rows to consume before persisting the consuming segment. If this value is set to 0, the configuration looks to realtime.segment.flush.threshold.segment.size below.
Default is 5,000,000
realtime.segment.flush.threshold.segment.size
Desired size of the completed segments. This value is used when realtime.segment.flush.threshold.rows is set to 0.
String, such as 150M or 1.1G., etc. Default is 200M (200 megabytes). You can also specify additional configurations for the consumer directly into streamConfigMaps. For example, for Kafka streams, add any of the configs described in to pass them directly to the Kafka consumer.
When the transform pipeline sets the $INCOMPLETE_RECORD_KEY$ key in the message, it is recorded as INCOMPLETE_REALTIME_ROWS_CONSUMED , only when continueOnError configuration is enabled. If the continueOnError is not enabled, the ingestion fails.
Index stage -> When there is failure at this stage, the ingestion typically stops and marks the partition as ERROR.
Config key
Description
Supported values
streamType
The streaming platform to ingest data from
kafka
stream.[streamType].consumer.type
Whether to use per partition low-level consumer or high-level stream consumer
- lowLevel: Consume data from each partition with offset management. - highLevel: Consume data without control over the partitions.
stream.[streamType].topic.name
Topic or data source to ingest data from
String
stream.[streamType].broker.list
_continueOnError
Set to true to skip any row indexing error and move on to the next row. Otherwise, an error evaluating a transform or filter function may block ingestion (real-time or offline), and result in data loss or corruption. Consider your use case to determine if it's preferable to set this option to false, and fail the ingestion if an error occurs to maintain data integrity.
rowTimeValueCheck
Set to true to validate the time column values ingested during segment upload. Validates each row of data in a segment matches the specified time format, and falls within a valid time range (1971-2071). If the value doesn't meet both criteria, Pinot replaces the value with null. This option ensures that the time values are strictly increasing and that there are no duplicates or gaps in the data.
_segmentTimeValueCheck
Set to true to validate the time range of the segment falls between 1971 and 2071. This option ensures data segments stored in the system are correct and consistent
currentOffsetsMap
Current consuming offset position per partition
latestUpstreamOffsetMap
(Wherever applicable) Latest offset found in the upstream topic partition
recordsLagMap
(Whenever applicable) Defines how far behind the current record's offset / pointer is from upstream latest record. This is calculated as the difference between the latestUpstreamOffset and currentOffset for the partition when the lag computation request is made.
recordsAvailabilityLagMap
(Whenever applicable) Defines how soon after record ingestion was the record consumed by Pinot. This is calculated as the difference between the time the record was consumed and the time at which the record was ingested upstream.
To update a record, you need a primary key to uniquely identify the record. To define a primary key, add the field primaryKeyColumns to the schema definition. For example, the schema definition of UpsertMeetupRSVP in the quick start example has this definition.
Note this field expects a list of columns, as the primary key can be a composite.
When two records of the same primary key are ingested, the record with the greater comparison value (timeColumn by default) is used. When records have the same primary key and event time, then the order is not determined. In most cases, the later ingested record will be used, but this may not be true in cases where the table has a column to sort by.
Partition the input stream by the primary key
An important requirement for the Pinot upsert table is to partition the input stream by the primary key. For Kafka messages, this means the producer shall set the key in the send API. If the original stream is not partitioned, then a streaming processing job (such as with Flink) is needed to shuffle and repartition the input stream into a partitioned one for Pinot's ingestion.
Enable upsert in the table configurations
To enable upsert, make the following configurations in the table configurations.
Upsert modes
Full upsert
The upsert mode defaults to NONE for real-time tables. To enable the full upsert, set the mode to FULL for the full update. FULL upsert means that a new record will replace the older record completely if they have same primary key. Example config:
Partial upserts
Partial upsert lets you choose to update only specific columns and ignore the rest.
To enable the partial upsert, set the mode to PARTIAL and specify partialUpsertStrategies for partial upsert columns. Since release-0.10.0, OVERWRITE is used as the default strategy for columns without a specified strategy. defaultPartialUpsertStrategy is also introduced to change the default strategy for all columns. For example:
Pinot supports the following partial upsert strategies:
Strategy
Description
OVERWRITE
Overwrite the column of the last record
INCREMENT
Add the new value to the existing values
APPEND
Add the new item to the Pinot unordered set
UNION
Add the new item to the Pinot unordered set if not exists
IGNORE
Ignore the new value, keep the existing value (v0.10.0+)
With partial upsert, if the value is null in either the existing record or the new coming record, Pinot will ignore the upsert strategy and the null value:
(null, newValue) -> newValue
(oldValue, null) -> oldValue
(null, null) -> null
Comparison column
By default, Pinot uses the value in the time column (timeColumn in tableConfig) to determine the latest record. That means, for two records with the same primary key, the record with the larger value of the time column is picked as the latest update. However, there are cases when users need to use another column to determine the order. In such case, you can use option comparisonColumn to override the column used for comparison. For example,
For partial upsert table, the out-of-order events won't be consumed and indexed. For example, for two records with the same primary key, if the record with the smaller value of the comparison column came later than the other record, it will be skipped.
Multiple comparison columns
In some cases, especially where partial upsert might be employed, there may be multiple producers of data each writing to a mutually exclusive set of columns, sharing only the primary key. In such a case, it may be helpful to use one comparison column per producer group so that each group can manage its own specific versioning semantics without the need to coordinate versioning across other producer groups.
Documents written to Pinot are expected to have exactly 1 non-null value out of the set of comparisonColumns; if more than 1 of the columns contains a value, the document will be rejected. When new documents are written, whichever comparison column is non-null will be compared against only that same comparison column seen in prior documents with the same primary key. Consider the following examples, where the documents are assumed to arrive in the order specified in the array.
The following would occur:
orderReceived: 1
Result: persisted
Reason: first doc seen for primary key "aa"
orderReceived: 2
Result: persisted (replacing orderReceived: 1)
Reason: comparison column (secondsSinceEpoch) larger than that previously seen
orderReceived: 3
Result: rejected
Reason: comparison column (secondsSinceEpoch) smaller than that previously seen
orderReceived: 4
Result: persisted (replacing orderReceived: 2)
Reason: comparison column (otherComparisonColumn) larger than previously seen (never seen previously), despite the value being smaller than that seen for secondsSinceEpoch
orderReceived: 5
Result: rejected
Reason: comparison column (otherComparisonColumn) smaller than that previously seen
orderReceived: 6
Result: persist (replacing orderReceived: 4)
Reason: comparison column (otherComparisonColumn) larger than that previously seen
Delete column
Upsert Pinot table can support soft-deletes of primary keys. This requires the incoming record to contain a dedicated boolean single-field column that serves as a delete marker for a primary key. Once the real-time engine encounters a record with delete column set to true , the primary key will no longer be part of the queryable set of documents. This means the primary key will not be visible in the queries, unless explicitly requested via query option skipUpsert=true.
Note that the delete column has to be a single-value boolean column.
Note that when deleteRecordColumn is added to an existing table, it will require a server restart to actually pick up the upsert config changes.
A deleted primary key can be revived by ingesting a record with the same primary, but with higher comparison column value(s).
Note that when reviving a primary key in a partial upsert table, the revived record will be treated as the source of truth for all columns. This means any previous updates to the columns will be ignored and overwritten with the new record's values.
Use strictReplicaGroup for routing
The upsert Pinot table can use only the low-level consumer for the input streams. As a result, it uses the partitioned replica-group assignment for the segments. Moreover, upsert poses the additional requirement that all segments of the same partition must be served from the same server to ensure the data consistency across the segments. Accordingly, it requires to use strictReplicaGroup as the routing strategy. To use that, configure instanceSelectorType in Routing as the following:
Enable validDocIds snapshots for upsert metadata recovery
Upsert snapshot support is also added in release-0.12.0. To enable the snapshot, set the enableSnapshot to true. For example:
Upsert maintains metadata in memory containing which docIds are valid in a particular segment (ValidDocIndexes). This metadata gets lost during server restarts and needs to be recreated again.
ValidDocIndexes can not be recovered easily after out-of-TTL primary keys get removed. Enabling snapshots addresses this problem by adding functions to store and recover validDocIds snapshot for Immutable Segments
The snapshots are taken on every segment commit to ensure that they are consistent with the persisted data in case of abrupt shutdown.
We recommend that you enable this feature so as to speed up server boot times during restarts.
The lifecycle for validDocIds snapshots are shows as follows,
If snapshot is enabled, load validDocIds from snapshot during add segments.
If snapshot is not enabled, delete validDocIds snapshots during add segments if exists.
If snapshot is enabled, persist validDocIds snapshot for immutable segments when removing segment.
Enable preload for faster restarts
Upsert preload support is also added in master. To enable the preload, set the enablePreload to true. For example:
For preload to improve your restart times, enableSnapshot: true should also we set in the table config.
Under the hood, it uses the snapshots to quickly insert the data instead of performing a whole upsert comparison flow for all the primary keys. The flow is triggered before server is marked as ready to load segments without snapshots (hence the name preload).
The feature also requires you to specify pinot.server.instance.max.segment.preload.threads: N in the server config where N should be replaced with the number of threads that should be used for preload.
This feature is still in beta.
Upsert table limitations
There are some limitations for the upsert Pinot tables.
The high-level consumer is not allowed for the input stream ingestion, which means stream.[consumerName].consumer.type must always be lowLevel.
The star-tree index cannot be used for indexing, as the star-tree index performs pre-aggregation during the ingestion.
Unlike append-only tables, out-of-order events (with comparison value in incoming record less than the latest available value) won't be consumed and indexed by Pinot partial upsert table, these late events will be skipped.
Best practices
Unlike other real-time tables, Upsert table takes up more memory resources as it needs to bookkeep the record locations in memory. As a result, it's important to plan the capacity beforehand, and monitor the resource usage. Here are some recommended practices of using Upsert table.
Create the topic/stream with more partitions.
The number of partitions in input streams determines the partition numbers of the Pinot table. The more partitions you have in input topic/stream, more Pinot servers you can distribute the Pinot table to and therefore more you can scale the table horizontally. Do note that you can't increase the partitions in future for upsert enabled tables so you need to start with good enough partitions (atleast 2-3X the number of pinot servers)
Memory usage
Upsert table maintains an in-memory map from the primary key to the record location. So it's recommended to use a simple primary key type and avoid composite primary keys to save the memory cost. In addition, consider the hashFunction config in the Upsert config, which can be MD5 or MURMUR3, to store the 128-bit hashcode of the primary key instead. This is useful when your primary key takes more space. But keep in mind, this hash may introduce collisions, though the chance is very low.
Monitoring
Set up a dashboard over the metric pinot.server.upsertPrimaryKeysCount.tableName to watch the number of primary keys in a table partition. It's useful for tracking its growth which is proportional to the memory usage growth. **** The total memory usage by upsert is roughly (primaryKeysCount * (sizeOfKeyInBytes + 24))
Capacity planning
It's useful to plan the capacity beforehand to ensure you will not run into resource constraints later. A simple way is to measure the rate of the primary keys in the input stream per partition and extrapolate the data to a specific time period (based on table retention) to approximate the memory usage. A heap dump is also useful to check the memory usage so far on an upsert table instance.
Example
Putting these together, you can find the table configurations of the quick start example as the following:
Pinot server maintains a primary key to record location map across all the segments served in an upsert-enabled table. As a result, when updating the config for an existing upsert table (e.g. change the columns in the primary key, change the comparison column), servers need to be restarted in order to apply the changes and rebuild the map.
Quick Start
To illustrate how the full upsert works, the Pinot binary comes with a quick start example. Use the following command to creates a real-time upsert table meetupRSVP.
You can also run partial upsert demo with the following command
As soon as data flows into the stream, the Pinot table will consume it and it will be ready for querying. Head over to the Query Console to checkout the real-time data.
Query the upsert table
For partial upsert you can see only the value from configured column changed based on specified partial upsert strategy.
Query the partial upsert table
An example for partial upsert is shown below, each of the event_id kept being unique during ingestion, meanwhile the value of rsvp_count incremented.
Explain partial upsert table
To see the difference from the non-upsert table, you can use a query option skipUpsert to skip the upsert effect in the query result.
Disable the upsert during query via query option
FAQ
Can I change primary key columns in existing upsert table?
Yes, you can add or delete columns to primary keys as long as input stream is partitioned on one of the primary key columns. However, you need to restart all Pinot servers so that it can rebuild the primary key to record location map with the new columns.
A consumption rate limiter is set up for topic <topic_name> in table <tableName> with rate limit: <rate_limit> (topic rate limit: <topic_rate_limit>, partition count: <partition_count>)
$ curl -X POST {controllerHost}/tables/{tableName}/forceCommit
$ curl -X POST {controllerHost}/tables/{tableName}/pauseConsumption
$ curl -X POST {controllerHost}/tables/{tableName}/resumeConsumption
$ curl -X POST {controllerHost}/tables/{tableName}/pauseStatus
$ curl -X POST {controllerHost}/tables/{tableName}/forceCommit
$ curl -X POST {controllerHost}/tables/{tableName}/resumeConsumption?resumeFrom=smallest
$ curl -X POST {controllerHost}/tables/{tableName}/resumeConsumption?resumeFrom=largest
# GET /tables/{tableName}/consumingSegmentsInfo
curl -X GET "http://<controller_url:controller_admin_port>/tables/meetupRsvp/consumingSegmentsInfo" -H "accept: application/json"

# GET /debug/tables/{tableName}
curl -X GET "http://localhost:9000/debug/tables/meetupRsvp?type=REALTIME&verbosity=1" -H "accept: application/json"
{
  "_segmentToConsumingInfoMap": {
    "meetupRsvp__0__0__20221019T0639Z": [
      {
        "serverName": "Server_192.168.0.103_7000",
        "consumerState": "CONSUMING",
        "lastConsumedTimestamp": 1666161593904,
        "partitionToOffsetMap": { // <<-- Deprecated. See currentOffsetsMap for same info
          "0": "6"
        },
        "partitionOffsetInfo": {
          "currentOffsetsMap": {
            "0": "6" // <-- Current consumer position
          },
          "latestUpstreamOffsetMap": {
            "0": "6"  // <-- Upstream latest position
          },
          "recordsLagMap": {
            "0": "0"  // <-- Lag, in terms of #records behind latest
          },
          "recordsAvailabilityLagMap": {
            "0": "2"  // <-- Lag, in terms of time
          }
        }
      }
    ],