Loading...
Loading...
Loading...
Loading...
Loading...
Loading...
Loading...
Loading...
Loading...
Loading...
Loading...
Loading...
Here you will find a collection of how-to guides for operators or developers
username: admin
password: admincontroller.admin.access.control.factory.class=org.apache.pinot.controller.api.access.ZkBasicAuthAccessControlFactory# the factory class property is different for the broker
pinot.broker.access.control.class=org.apache.pinot.broker.broker.ZkBasicAuthAccessControlFactorySET AndScanReordering = 'True'; SELECT FOO from BAR WHERE predicate1 AND predicate2 AND predicate3 AND predicate4 ...pinot.server.instance.segment.stream.download.untar : true
// enable stream download and untar
pinot.server.instance.segment.stream.download.untar.rate.limit.bytes.per.sec : 100000000
// the max download-untar rate is limited to 100000000 bytes/secpinot.server.instance.table.level.max.parallel.segment.downloads : 4pinot.broker.tls.ssl.provider : OPENSSL
pinot.server.tls.ssl.provider : OPENSSLpinot.broker.netty.native.transports.enabled : true
pinot.server.netty.native.transports.enabled : trueresources:
requests:
cpu: 1
memory: 1G
limits:
cpu: 1
memory: 1Gresources:
requests:
cpu: 1
memory: 1G
limits:
cpu: 1
memory: 1GjvmOpts: "-Xms256M -Xmx1G"resources:
requests:
cpu: 4
memory: 10G
limits:
cpu: 4
memory: 10GjvmOpts: "-Xms1G -Xmx4G"## Adding Pinot helm repo
helm repo add pinot https://raw.githubusercontent.com/apache/pinot/master/kubernetes/helm
## Extract all the configurable values of Pinot Helm into a config.
helm inspect values pinot/pinot > /tmp/pinot-values.yamlcontroller:
...
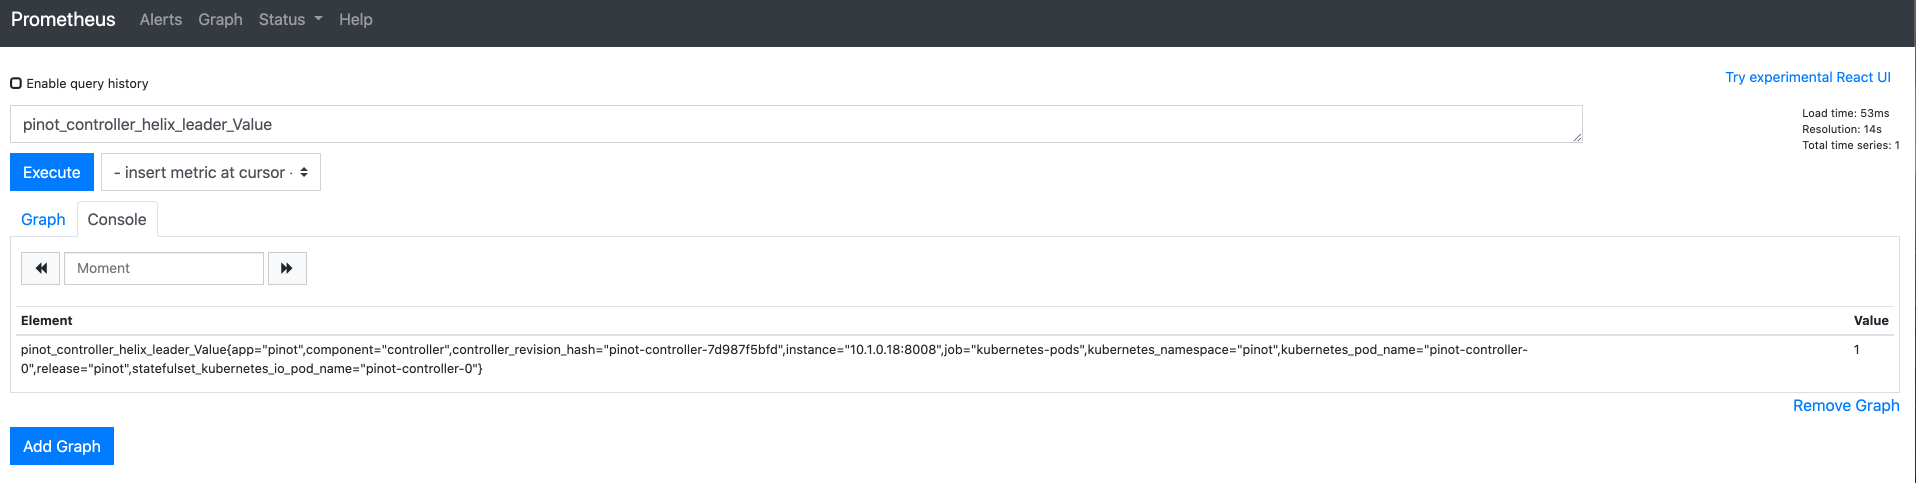
jvmOpts: "-javaagent:/opt/pinot/etc/jmx_prometheus_javaagent/jmx_prometheus_javaagent.jar=8008:/opt/pinot/etc/jmx_prometheus_javaagent/configs/pinot.yml -Xms256M -Xmx1G"controller:
...
service:
annotations:
"prometheus.io/scrape": "true"
"prometheus.io/port": "8008"
...
podAnnotations:
"prometheus.io/scrape": "true"
"prometheus.io/port": "8008"kubectl create ns pinot
helm install pinot pinot/pinot -n pinot --values /tmp/pinot-values.yamlhelm repo add prometheus-community https://prometheus-community.github.io/helm-charts
helm inspect values prometheus-community/prometheus > /tmp/prometheus-values.yamlkubectl create ns prometheus
helm install prometheus prometheus-community/prometheus -n prometheus --values /tmp/prometheus-values.yamlkubectl port-forward service/prometheus-server 30080:80 -n prometheushelm repo add grafana https://grafana.github.io/helm-charts
helm inspect values grafana/grafana > /tmp/grafana-values.yamlkubectl create ns grafana
helm install grafana grafana/grafana -n grafana --values /tmp/grafana-values.yamlkubectl get secret --namespace grafana grafana -o jsonpath="{.data.admin-password}" | base64 --decode ; echokubectl port-forward service/grafana 20080:80 -n grafana$ ./pinot-distribution/target/apache-pinot-0.8.0-SNAPSHOT-bin/apache-pinot-0.8.0-SNAPSHOT-bin/bin/pinot-admin.sh CreateSegment -dataDir /Users/host1/Desktop/test/ -format CSV -outDir /Users/host1/Desktop/test2/ -tableName baseballStats -segmentName baseballStats_data -overwrite -schemaFile ./pinot-distribution/target/apache-pinot-0.8.0-SNAPSHOT-bin/apache-pinot-0.8.0-SNAPSHOT-bin/sample_data/baseballStats_schema.json
Executing command: CreateSegment -generatorConfigFile null -dataDir /Users/host1/Desktop/test/ -format CSV -outDir /Users/host1/Desktop/test2/ -overwrite true -tableName baseballStats -segmentName baseballStats_data -timeColumnName null -schemaFile ./pinot-distribution/target/apache-pinot-0.8.0-SNAPSHOT-bin/apache-pinot-0.8.0-SNAPSHOT-bin/sample_data/baseballStats_schema.json -readerConfigFile null -enableStarTreeIndex false -starTreeIndexSpecFile null -hllSize 9 -hllColumns null -hllSuffix _hll -numThreads 1
Accepted files: [/Users/host1/Desktop/test/baseballStats_data.csv]
Finished building StatsCollector!
Collected stats for 97889 documents
Created dictionary for INT column: homeRuns with cardinality: 67, range: 0 to 73
Created dictionary for INT column: playerStint with cardinality: 5, range: 1 to 5
Created dictionary for INT column: groundedIntoDoublePlays with cardinality: 35, range: 0 to 36
Created dictionary for INT column: numberOfGames with cardinality: 165, range: 1 to 165
Created dictionary for INT column: AtBatting with cardinality: 699, range: 0 to 716
Created dictionary for INT column: stolenBases with cardinality: 114, range: 0 to 138
Created dictionary for INT column: tripples with cardinality: 32, range: 0 to 36
Created dictionary for INT column: hitsByPitch with cardinality: 41, range: 0 to 51
Created dictionary for STRING column: teamID with cardinality: 149, max length in bytes: 3, range: ALT to WSU
Created dictionary for INT column: numberOfGamesAsBatter with cardinality: 166, range: 0 to 165
Created dictionary for INT column: strikeouts with cardinality: 199, range: 0 to 223
Created dictionary for INT column: sacrificeFlies with cardinality: 20, range: 0 to 19
Created dictionary for INT column: caughtStealing with cardinality: 36, range: 0 to 42
Created dictionary for INT column: baseOnBalls with cardinality: 154, range: 0 to 232
Created dictionary for STRING column: playerName with cardinality: 11976, max length in bytes: 43, range: to Zoilo Casanova
Created dictionary for INT column: doules with cardinality: 64, range: 0 to 67
Created dictionary for STRING column: league with cardinality: 7, max length in bytes: 2, range: AA to UA
Created dictionary for INT column: yearID with cardinality: 143, range: 1871 to 2013
Created dictionary for INT column: hits with cardinality: 250, range: 0 to 262
Created dictionary for INT column: runsBattedIn with cardinality: 175, range: 0 to 191
Created dictionary for INT column: G_old with cardinality: 166, range: 0 to 165
Created dictionary for INT column: sacrificeHits with cardinality: 54, range: 0 to 67
Created dictionary for INT column: intentionalWalks with cardinality: 45, range: 0 to 120
Created dictionary for INT column: runs with cardinality: 167, range: 0 to 192
Created dictionary for STRING column: playerID with cardinality: 18107, max length in bytes: 9, range: aardsda01 to zwilldu01
Start building IndexCreator!
Finished records indexing in IndexCreator!
Finished segment seal!
Converting segment: /Users/host1/Desktop/test2/baseballStats_data_0 to v3 format
v3 segment location for segment: baseballStats_data_0 is /Users/host1/Desktop/test2/baseballStats_data_0/v3
Deleting files in v1 segment directory: /Users/host1/Desktop/test2/baseballStats_data_0
Driver, record read time : 369
Driver, stats collector time : 0
Driver, indexing time : 373$ ./pinot-distribution/target/apache-pinot-0.8.0-SNAPSHOT-bin/apache-pinot-0.8.0-SNAPSHOT-bin/bin/pinot-admin.sh PostQuery -query "select count(*) from baseballStats"
Executing command: PostQuery -brokerHost [broker_host] -brokerPort [broker_port] -query select count(*) from baseballStats
Result: {"aggregationResults":[{"function":"count_star","value":"97889"}],"exceptions":[],"numServersQueried":1,"numServersResponded":1,"numSegmentsQueried":1,"numSegmentsProcessed":1,"numSegmentsMatched":1,"numDocsScanned":97889,"numEntriesScannedInFilter":0,"numEntriesScannedPostFilter":0,"numGroupsLimitReached":false,"totalDocs":97889,"timeUsedMs":107,"segmentStatistics":[],"traceInfo":{}}git clone [email protected]:apache/pinot.git pinot
cd pinot/docker/images# Enable the controller to fetch segments by providing the credentials as a token
controller.segment.fetcher.auth.token=Basic YWRtaW46dmVyeXNlY3JldA
# "Basic " + base64encode("admin:verysecret")# no tokens requiredsegment.fetcher.auth.token=Basic YWRtaW46dmVyeXNlY3JldA
task.auth.token=Basic YWRtaW46dmVyeXNlY3JldA
pinot.server.segment.fetcher.auth.token=Basic YWRtaW46dmVyeXNlY3JldA
pinot.server.segment.uploader.auth.token=Basic YWRtaW46dmVyeXNlY3JldA
pinot.server.instance.auth.token=Basic YWRtaW46dmVyeXNlY3JldA# Create users "admin" and "user". Keep in mind we're not enforcing any ACLs yet.
controller.admin.access.control.principals=admin,user
# Set the user's password to "secret" and allow "READ" only
controller.admin.access.control.principals.user.password=secret
controller.admin.access.control.principals.user.permissions=READ
# Set the admin's password to "verysecret"
controller.admin.access.control.principals.admin.password=verysecret
controller.admin.access.control.factory.class=org.apache.pinot.controller.api.access.BasicAuthAccessControlFactory# the factory class property is different for the broker
pinot.broker.access.control.class=org.apache.pinot.broker.broker.BasicAuthAccessControlFactory
pinot.broker.access.control.principals=admin,user
pinot.broker.access.control.principals.admin.password=verysecret
pinot.broker.access.control.principals.user.password=secret
# No need to set READ permissions here since broker requests are read-only$ bin/pinot-admin.sh PostQuery \
-user user -password secret \
-brokerPort 8000 -query 'SELECT * FROM baseballStats'$ bin/pinot-admin.sh PostQuery \
-authToken "Basic dXNlcjpzZWNyZXQ=" \
-brokerPort 8000 -query 'SELECT * FROM baseballStats'$ curl http://localhost:8000/query/sql \
-H 'Authorization: Basic dXNlcjpzZWNyZXQ=' \
-d '{"sql":"SELECT * FROM baseballStats"}'controller.admin.access.control.factory.class=org.apache.pinot.controller.api.access.BasicAuthAccessControlFactory
controller.admin.access.control.principals=admin,user
controller.admin.access.control.principals.admin.password=verysecret
controller.admin.access.control.principals.user.password=secret
controller.admin.access.control.principals.user.tables=myusertable,baseballStats,stuff
controller.admin.access.control.principals.user.permissions=READ# the factory class property is different for the broker
pinot.broker.access.control.class=org.apache.pinot.broker.broker.BasicAuthAccessControlFactory
pinot.broker.access.control.principals=admin,user
pinot.broker.access.control.principals.admin.password=verysecret
pinot.broker.access.control.principals.user.password=secret
pinot.broker.access.control.principals.user.tables=baseballStats,otherstuffauthToken: Basic YWRtaW46dmVyeXNlY3JldA$ bin/pinot-admin.sh LaunchDataIngestionJob \
-user admin -password verysecret \
-jobSpecFile myJobSpec.yaml$ bin/pinot-admin.sh LaunchDataIngestionJob \
-authToken "Basic YWRtaW46dmVyeXNlY3JldA" \
-jobSpecFile myJobSpec.yaml# this requires a reference to "${authToken}" in myJobSpec.yaml!
$ bin/pinot-admin.sh LaunchDataIngestionJob \
-jobSpecFile myJobSpec.yaml \
-values "authToken=Basic YWRtaW46dmVyeXNlY3JldA"./docker-build.sh [Docker Tag] [Git Branch] [Pinot Git URL] [Kafka Version] [Java Version] [JDK Version] [OpenJDK Image ]./docker-build.sh pinot_fork:snapshot-5.2 snapshot-5.2 https://github.com/your_own_fork/pinot.git./docker-build.sh pinot:release-0.1.0 release-0.1.0 https://github.com/apache/pinot.git./docker-build.sh pinot:latest master https://github.com/apache/pinot.git 2.0 11 11 arm64v8/openjdkdocker build -t pinot:latest --no-cache --network=host --build-arg PINOT_GIT_URL=https://github.com/apache/pinot.git --build-arg PINOT_BRANCH=master --build-arg JDK_VERSION=11 --build-arg OPENJDK_IMAGE=arm64v8/openjdk -f Dockerfile .docker build -t pinot:latest --platform linux/arm64 --no-cache --network=host --build-arg PINOT_GIT_URL=https://github.com/apache/pinot.git --build-arg PINOT_BRANCH=master --build-arg JDK_VERSION=11 --build-arg OPENJDK_IMAGE=arm64v8/openjdk -f Dockerfile ../docker-push.sh apachepinot/pinot:latestdocker tag pinot:release-0.1.0 apachepinot/pinot:release-0.1.0
docker push apachepinot/pinot:release-0.1.0./docker-build-and-push.sh apachepinot/pinot:latest master https://github.com/apache/pinot.git./docker-build.sh [Docker Tag] [Git Branch] [Presto Git URL]docker push apachepinot/pinot-presto:latestmake latestdocker build \
--build-arg NODE_VERSION=latest \
--build-arg PYTHON_VERSION=3.6 \
--build-arg SUPERSET_VERSION=0.34.1 \
--tag apachepinot/pinot-superset:0.34.1 \
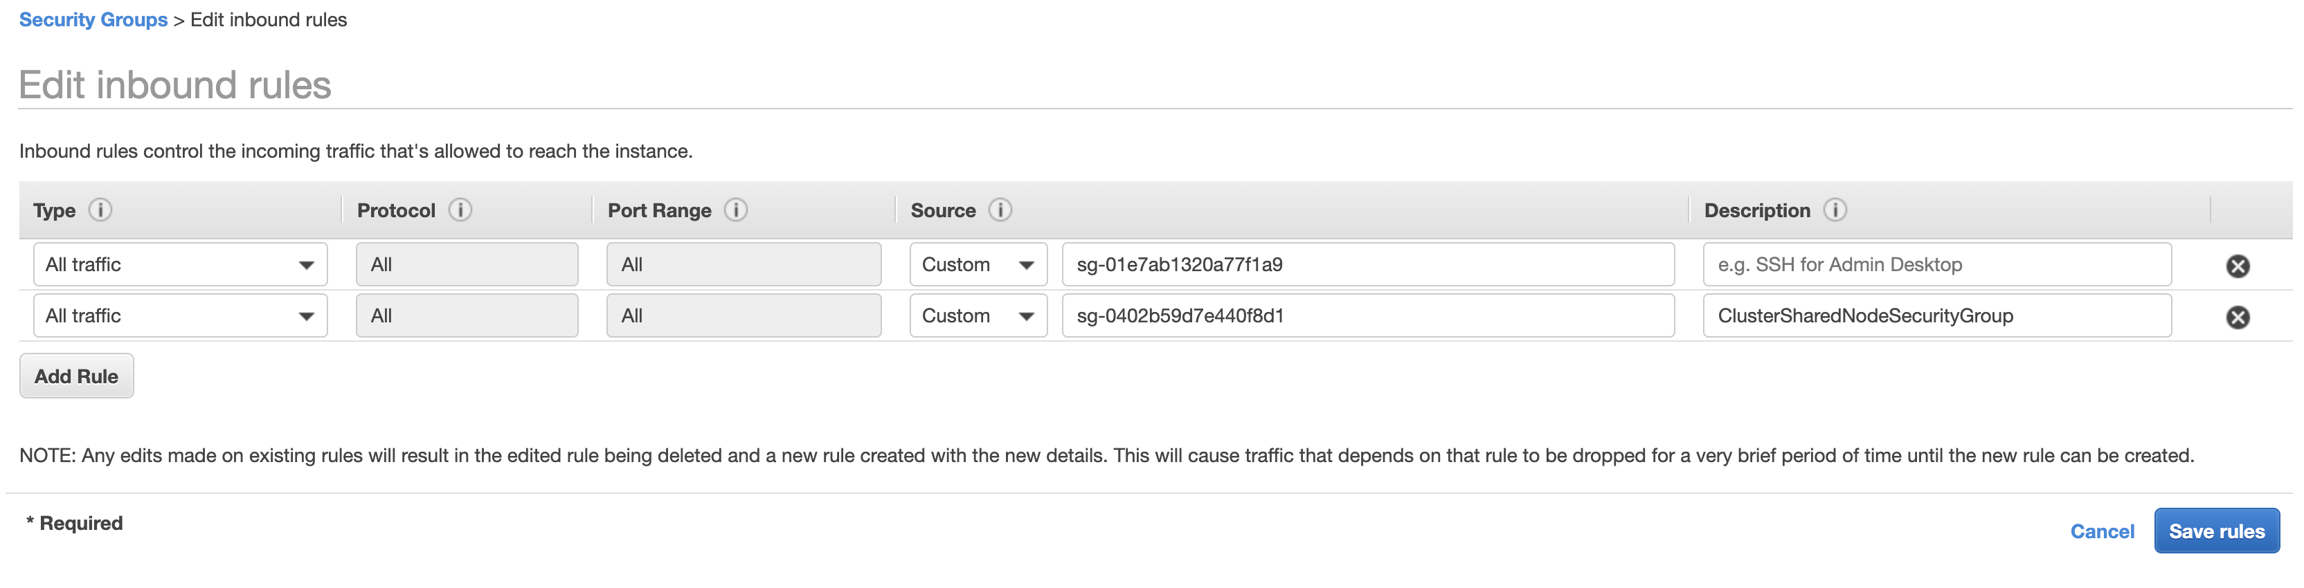
--target build .make pushBoth TLS encrypted and plaintext traffic allowed**Set up TLS-secured connections inside and outside your cluster
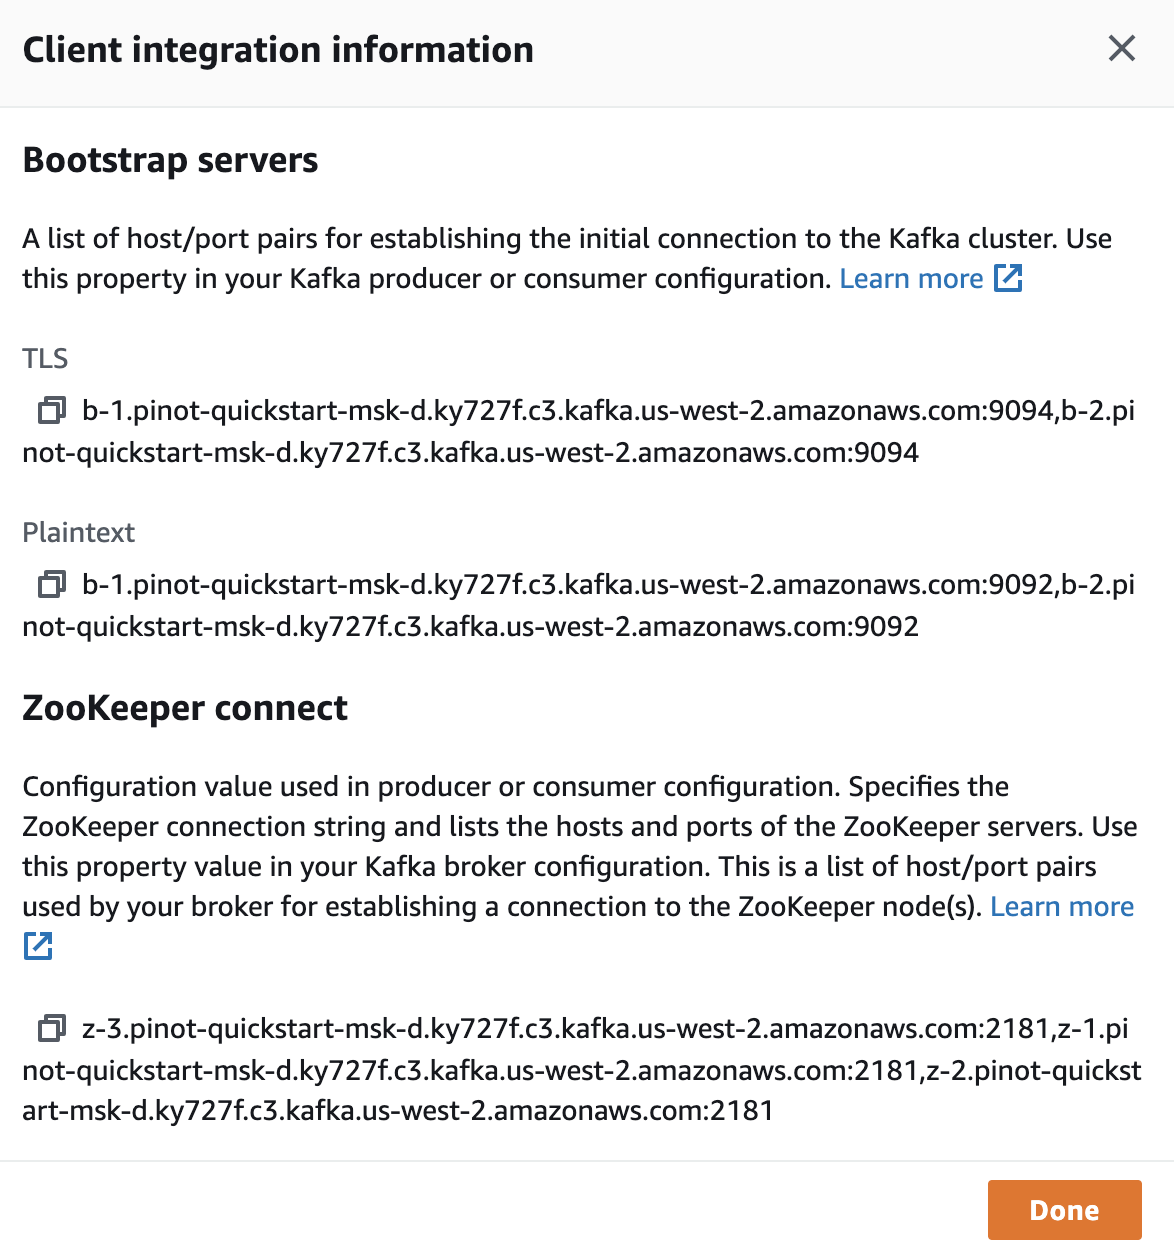
ZOOKEEPER_CONNECT_STRING="z-3.pinot-quickstart-msk-d.ky727f.c3.kafka.us-west-2.amazonaws.com:2181,z-1.pinot-quickstart-msk-d.ky727f.c3.kafka.us-west-2.amazonaws.com:2181,z-2.pinot-quickstart-msk-d.ky727f.c3.kafka.us-west-2.amazonaws.com:2181"
BROKER_LIST_STRING="b-1.pinot-quickstart-msk-d.ky727f.c3.kafka.us-west-2.amazonaws.com:9092,b-2.pinot-quickstart-msk-d.ky727f.c3.kafka.us-west-2.amazonaws.com:9092"kubectl exec -it pod/pinot-controller-0 -n pinot-quickstart bashapt-get update
apt-get install wget -y
wget https://archive.apache.org/dist/kafka/2.2.1/kafka_2.12-2.2.1.tgz
tar -xzf kafka_2.12-2.2.1.tgz
cd kafka_2.12-2.2.1bin/kafka-topics.sh \
--zookeeper ${ZOOKEEPER_CONNECT_STRING} \
--create \
--topic pullRequestMergedEventsAwsMskDemo \
--replication-factor 1 \
--partitions 1Created topic "pullRequestMergedEventsAwsMskDemo".kubectl apply -f github-events-aws-msk-demo.yamlbin/kafka-console-consumer.sh \
--bootstrap-server ${BROKER_LIST_STRING} \
--topic pullRequestMergedEventsAwsMskDemokubectl get pod -n pinot-quickstart |grep pinot-github-events-data-into-msk-kafkapinot-github-events-data-into-msk-kafka-68948fb4cd-rrzlf 1/1 Running 0 14mpodname=`kubectl get pod -n pinot-quickstart |grep pinot-github-events-data-into-msk-kafka|awk '{print $1}'`
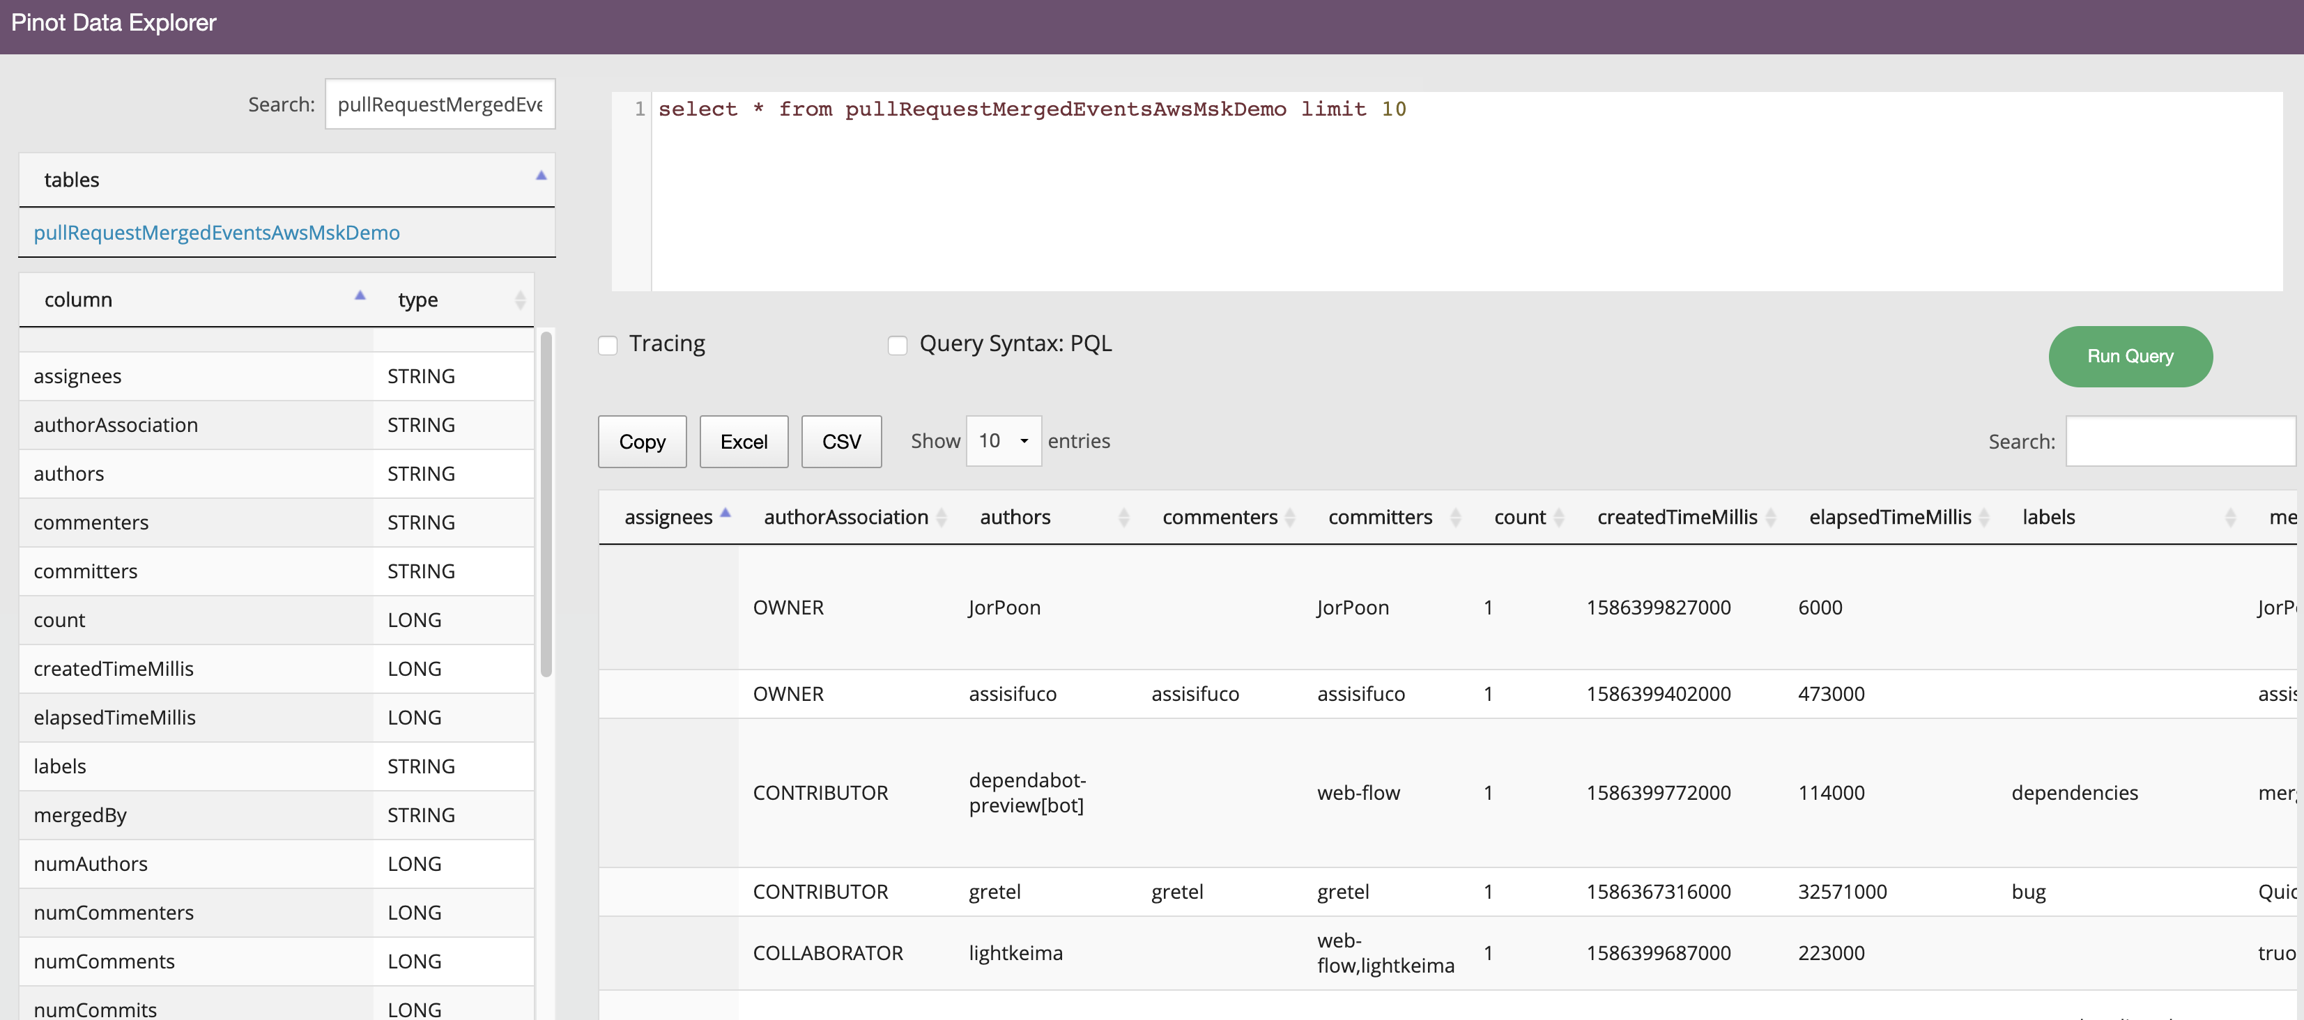
kubectl exec -it ${podname} -n pinot-quickstart bashbin/pinot-admin.sh AddTable \
-controllerHost pinot-controller \
-tableConfigFile /var/pinot/examples/pullRequestMergedEventsAwsMskDemo_realtime_table_config.json \
-schemaFile /var/pinot/examples/pullRequestMergedEventsAwsMskDemo_schema.json \
-execExecuting command: AddTable -tableConfigFile /var/pinot/examples/pullRequestMergedEventsAwsMskDemo_realtime_table_config.json -schemaFile /var/pinot/examples/pullRequestMergedEventsAwsMskDemo_schema.json -controllerHost pinot-controller -controllerPort 9000 -exec
Sending request: http://pinot-controller:9000/schemas to controller: pinot-controller-0.pinot-controller-headless.pinot-quickstart.svc.cluster.local, version: Unknown
{"status":"Table pullRequestMergedEventsAwsMskDemo_REALTIME succesfully added"}